English
Login

Extruder linearity correction calibration

Relevant for

MK3
MK3S
MK3S+
56 comments
Article is also available in following languages
English
Čeština
Polski
Deutsch
Français
Español
Italiano
日本語
This is an advanced calibration, recommended only to experienced users.
This calibration only works on the firmware version 3.2.0 or newer and only works on the Original Prusa MK3 and MK3S, due to the Trinamic stepper drivers of the Einsy RAMBo.

Linearity correction is based on the Trinamic stepper driver feature that allows defining a custom current-waveform. The default Trinamic waveform is a sine function, but the real waveform can be a little bit different and depends on the stepper motor type. Also, motors of the same type can have different waveforms. The biggest distortion appears when the wave is crossing the zero point (or around it), so the original sine wave is modified using power function to eliminate this distortion.

This article addresses linear correction for the Extruder only.

Linearity correction calibration procedure

  1. Go to your printer's LCD menu -> Settings -> Lin.Correction->E correct, and then turn it off
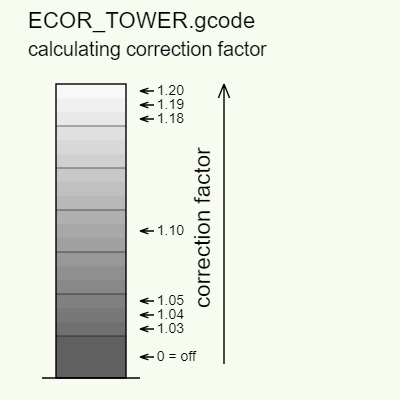
  2. Download and print the Calibration g-code
  3. You will observe that some diagonal moire lines will appear on the tower. Find a place with the best surface on the calibration object.

Focus especially on 45-degree lines visible as a darker reflection
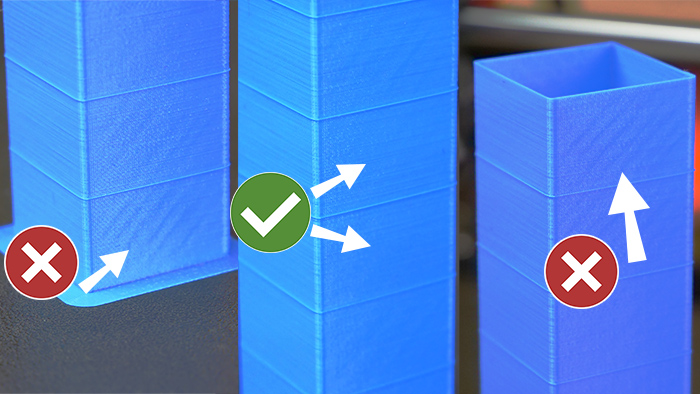
  1. Most printers will have minimal distortion around the vertical center of the object (value 1.10), but yours might be different. Note your ideal value.

Ecor Tower

  1. Enable the E-correction again in LCD menu -> Settings -> Lin.Correction->E correct. Adjust the value to the one that you were happy with.

    In firmware 3.13.0 and newer, there has been a change in the menu numbering system for the correction factor, ranging from 0 to 200.

    Here's how it corresponds:

    Correction factor 1.03 is represented as 030 in the menu.
    Correction factor 1.11 is represented as 110 in the menu.

  2. Print something and see if the diagonal lines are still there. If so, please go back to step 3.
Calibration object GitHub page- ECOR_TOWER.
 

26 comments

Log in  to post a comment
Hermit
Mk3s+ on firmware 3.14
In LCD menu -> Settings -> Lin.Correction->E correctDefault E-Correct is set to 0 and selecting it the value changes to 29, I can change it between 29 and 200 but there is no option for "off" or even going back to zero but restarting the printer with it set to 29 it reverts back to zero.So I thought maybe 29 = 0 and printed the test gcode.The very bottom of the column is almost perfect and it gets progressively worse the higher up it goes.Does this mean im all good and just leave it at 0?
bryn51
It would be useful to augment this guide with the newer model printers as target.  The MK3 is now obsolescent, the MK4 is king, followed closely by the XL.
numo
Hello, is there any way to set this for mk3.5? No such setting in the menu. Does the firmware implement the necessary g-code so one can do the calibration and update the start code?
mSarheed
After printing out the gcode, I have found that the value 1.1 works best for me. How can i enter this into the settings? When going into Settings -> Lin.Corr -> E-Correct im only able to enter whole numbers starting from 0 up to 200? I3 MK3S with newest firmware.
David B.

Hi! The numbering has changed in FW 3.13 and up. 
30 = 1.030
110 = 1.110

Thanks for the notice. We will update the article accordingly.

Lambi
With the latest firmware, it seems impossible to manually set this setting to "off". When entering the setting for the first time; the value shows as "0", but as soon as you change it, it cannot be changed lower than "29". How can you actually turn the setting OFF now?
andynewsom
Same for me, presumably becuause we aren't on Firmware version 3.2, which apparently isn't available for the MK3S+
ljhms
How come there is no setting in the firmware between 0 (off) and 1.03? And should that 0 = off actually be 1 in the diagram, since it's a correction factor?
ljhms
I checked the GCODE and firmware, and it turns out I was wrong. OFF does indeed correspond to an argument of 0 to the wave correcting function in the firmware (which turns off the power function correction entirely). Carry on, nothing to see here.