EasyPrint es una herramienta de laminado basada en la nube que te permite preparar rápidamente un modelo para su impresión en 3D desde tu teléfono, tableta u ordenador y enviarlo a tu impresora a través de Prusa Connect. Está disponible de forma totalmente gratuita en el sitio web de Printables y dentro de la App de Prusa.
A diferencia del potente pero complejo PrusaSlicer, EasyPrint tiene, por diseño, un alcance limitado. El usuario solo tiene que seleccionar unos pocos ajustes importantes, como el perfil de calidad de impresión y el tipo de filamento. La aplicación decide automáticamente el resto de ajustes. A continuación se describe el flujo de trabajo básico.
Técnicamente hablando, EasyPrint es solo una interfaz simplificada para PrusaSlicer, instalado en nuestros servidores, que se encarga del proceso de laminado real. También puedes descargar el archivo de tu proyecto desde EasyPrint en formato 3MF y abrirlo en tu ordenador con PrusaSlicer. De esta forma, podrás ajustar la configuración si es necesario o simplemente guardar el proyecto para utilizarlo más adelante.
Las capturas de pantalla que se muestran a continuación muestran principalmente EasyPrint en un ordenador con pantalla panorámica. En una tableta o un smartphone, el diseño es ligeramente diferente para adaptarse a la pantalla más pequeña, pero la funcionalidad general es la misma. Se puede acceder a todo únicamente mediante controles táctiles.
Accediendo a EasyPrint
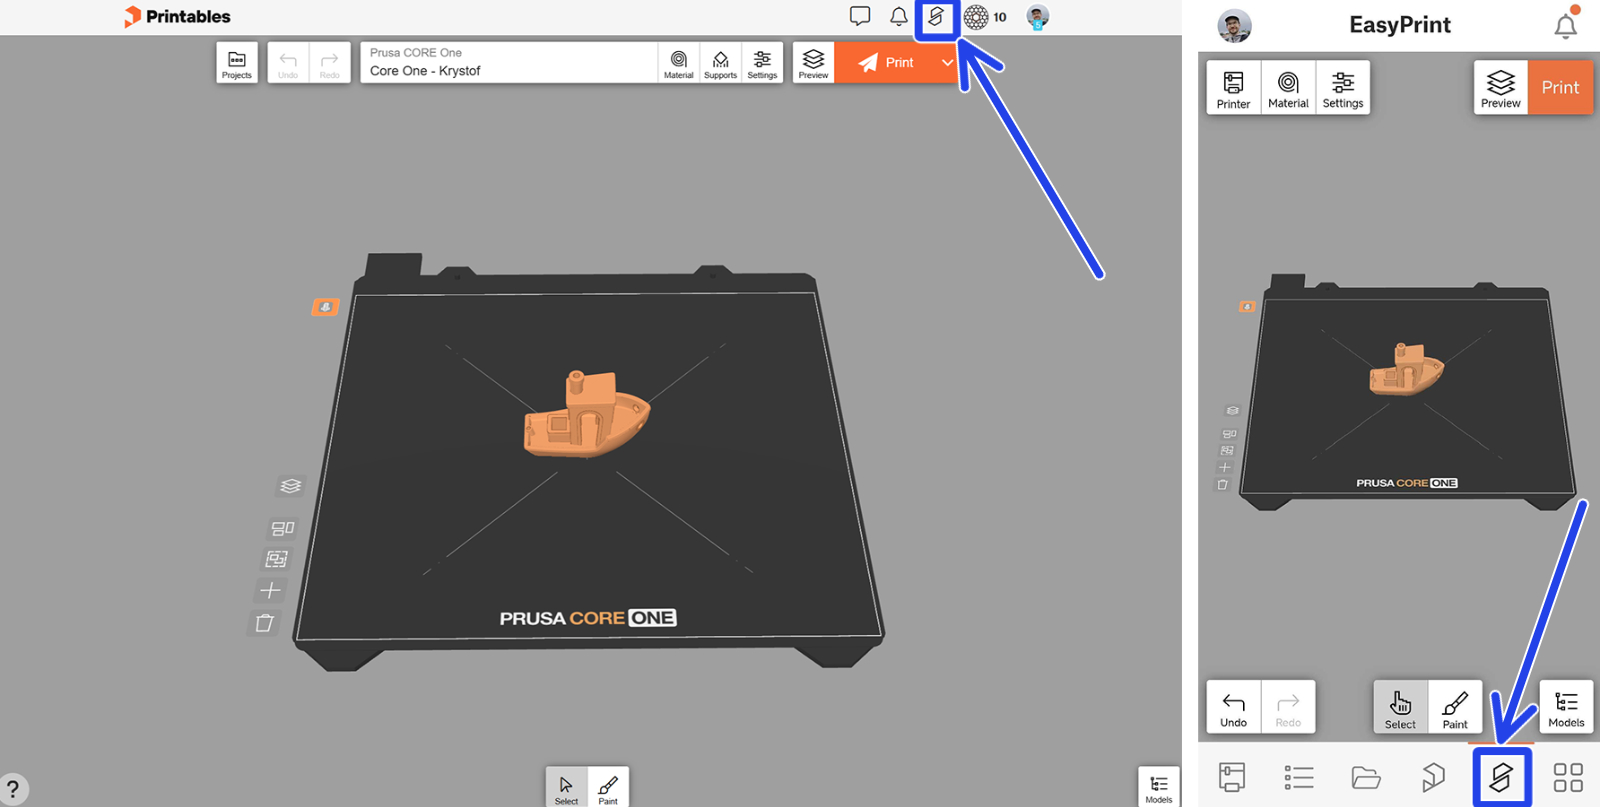
Mientras navegas en Printables, haz clic en el botón de EasyPrint del menú superior para abrir la interfaz de EasyPrint. En la aplicación de Prusa, este botón de acceso se encuentra en el menú inferior.
La interfaz básica de EasyPrint incluye todas las herramientas necesarias.
- La pestaña de Proyectos;
- botones de deshacer/rehacer;
- ajustes de impresión;
- ajustes de exportación.
- botones específicos para los objetos de esa base: alternar vista previa, organizar objetos, seleccionar todo, añadir modelo y eliminar todo;
- configuración de herramientas (para asignar colores en impresoras multi-cabezal, p. ej., Original Prusa XL);
- descripción general de los atajos de teclado (no disponible en smartphones y tabletas);
- para activarla herramienta de pintado y piel difusa;
- la lista de modelos en el proyecto.
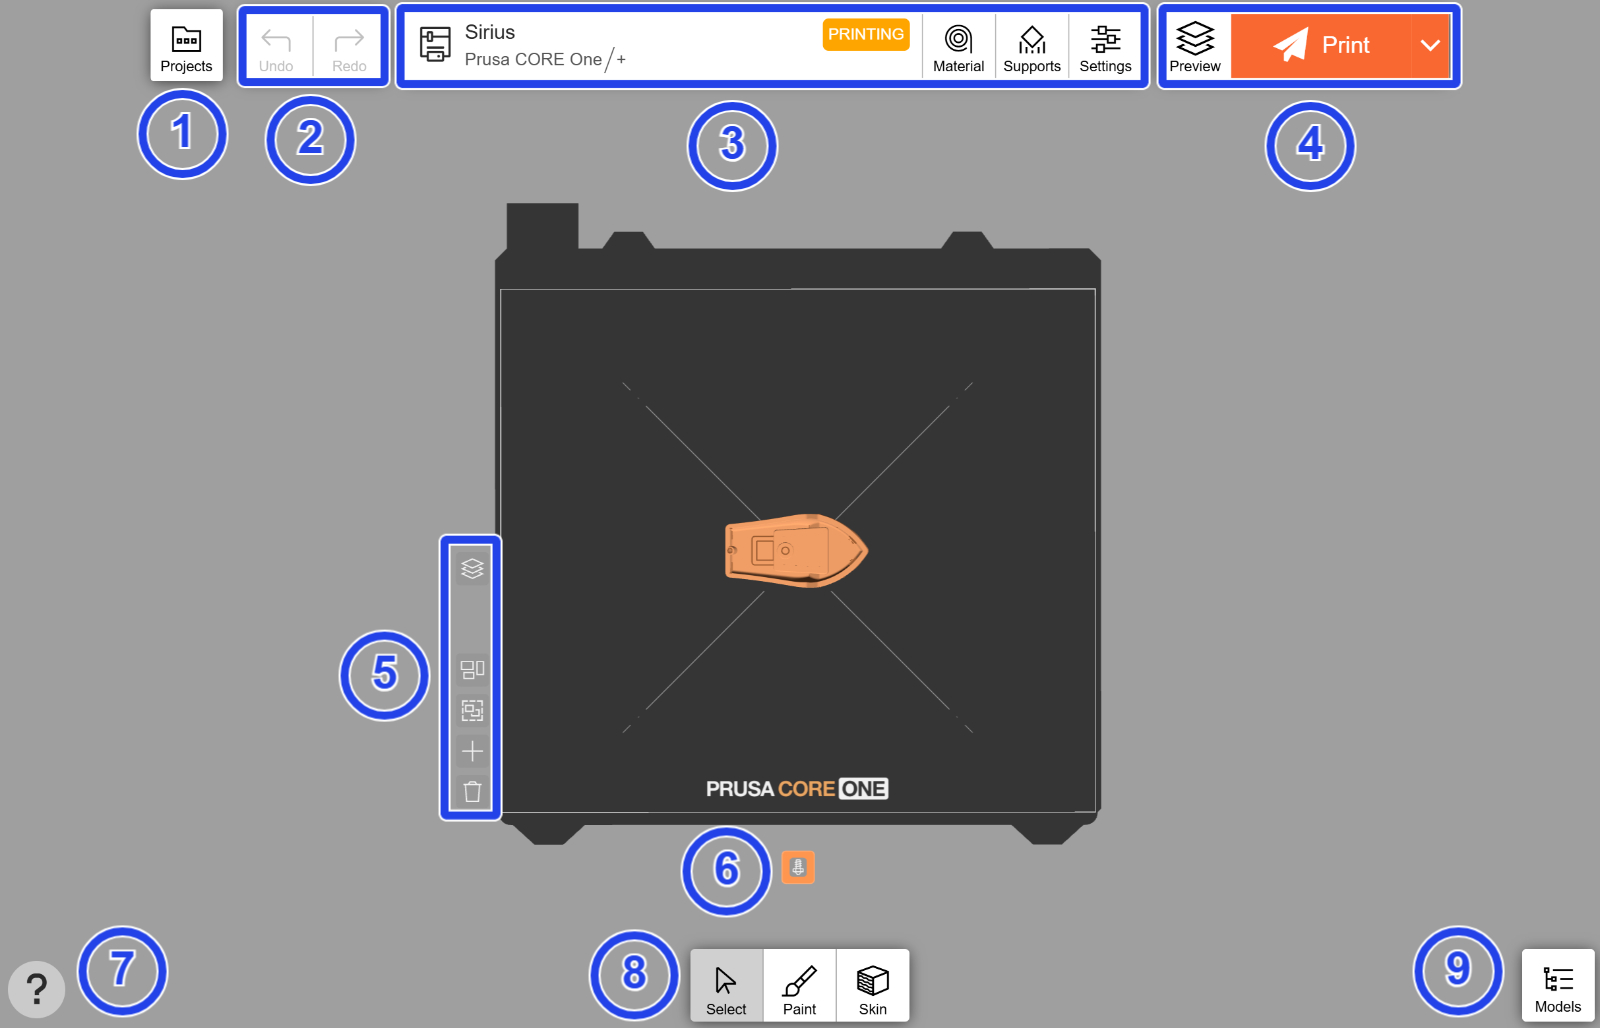
La parte principal de la pantalla consiste en una representación a escala de la lámina de impresión, en la que puedes mover y ajustar los modelos que desees imprimir.
Informaciones emergentes
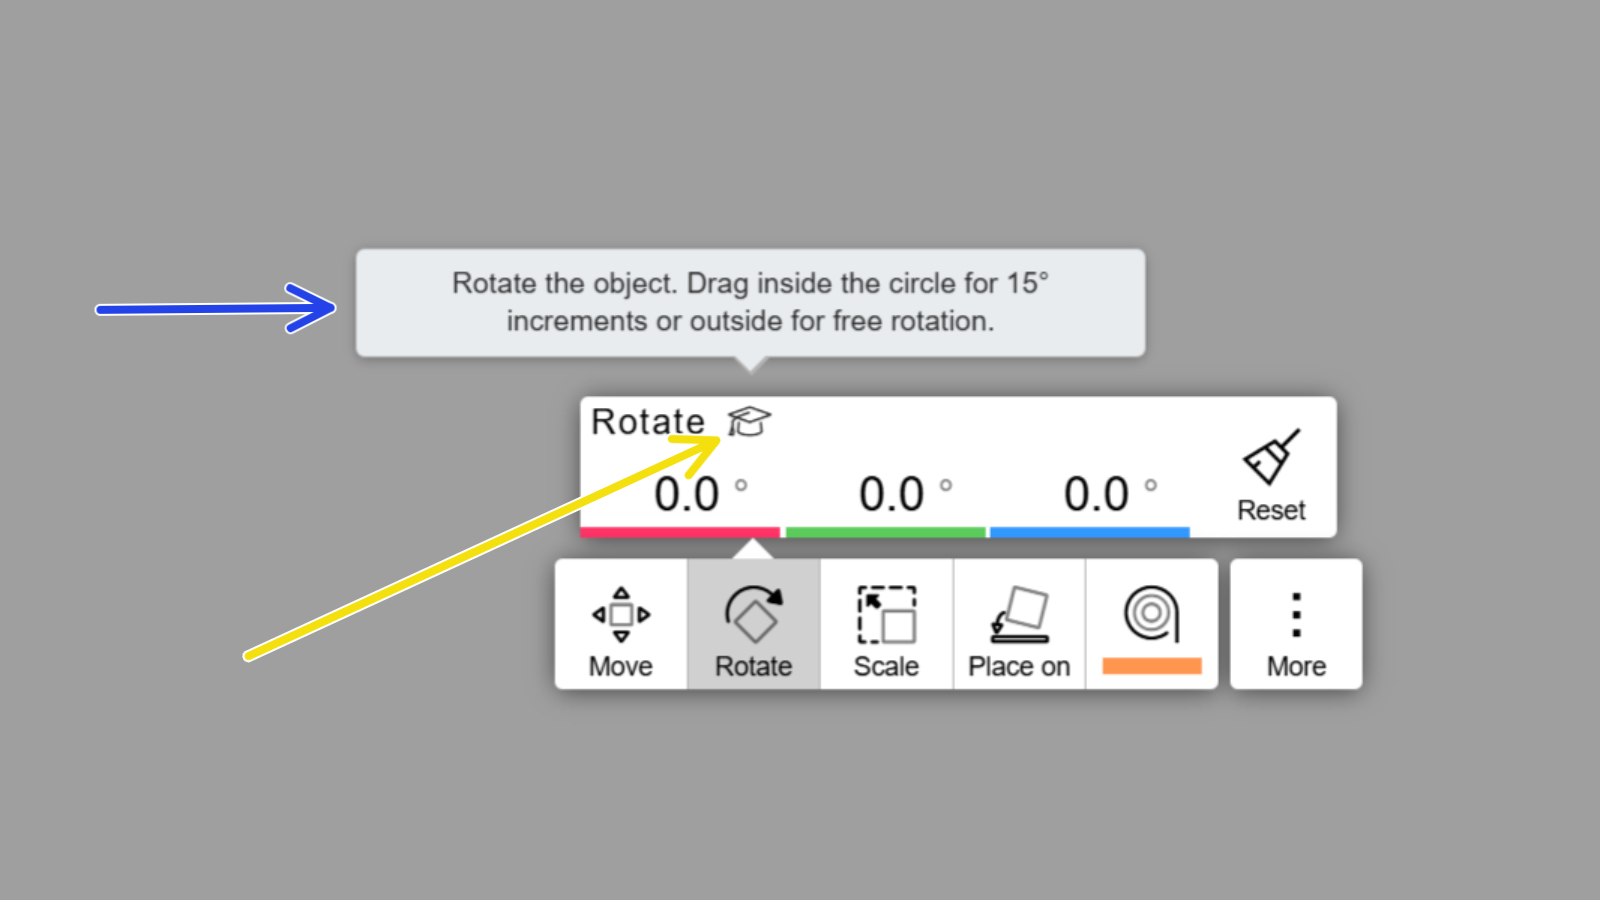
La mayoría de las herramientas y opciones de EasyPrint incluyen sugerencias rápidas representadas por un icono de birrete de graduación. Para ver la sugerencia, pasa el cursor del ratón por encima del icono (en el ordenador) o toca el icono (en un dispositivo móvil).
Importación y Carga de Modelos
Al explorar Printables, todos los modelos compatibles muestran el botón EasyPrint junto a ellos. A partir de abril de 2026, se admiten archivos STL y 3MF. Haz clic en el botón para añadir ese modelo a tu lista de impresión, que funciona como un “carrito de la compra” para los modelos que deseas imprimir.
Una vez que tengas todos los modelos en tu lista de impresión, haz clic en continuar para pasar a la pantalla de laminado. Todos los objetos de tu lista de impresión se colocarán automáticamente en una plataforma de impresión virtual.
También puedes subir modelos desde tu propio dispositivo haciendo clic en el botón Modelos situado en la esquina inferior derecha, y luego en Añadir… y Cargar modelo. En esa misma pestaña también puedes buscar y añadir otros modelos de Printables. El botón "+" situado a la izquierda de la lámina de impresión también sirve para añadir modelos.
Orientación y Escala del Modelo
YEs posible que tengas que girar el objeto para mejorar su imprimibilidad (por ejemplo, para reducir al mínimo el número de soportes necesarios). Puedes hacerlo fácilmente tocando el objeto y utilizando la función Colocar en la cara. Haz clic en una de las caras resaltadas para alinearla con la plataforma de impresión. Normalmente, los objetos se imprimen con la cara más grande en contacto con la plataforma.
En el caso de algunos objetos que no tengan una cara plana destacada, es posible que la opción Colocar en la cara no esté disponible. En ese caso, puedes ajustar manualmente la orientación con la herramienta Girar. Puedes utilizar las flechas para girar el objeto a lo largo de sus tres ejes. Si mantienes el cursor o el dedo sobre el controlador circular, el ángulo de rotación se ajustará en incrementos de 15 grados. También puedes introducir manualmente los ángulos de rotación.

La herramienta Escalar te permite cambiar el tamaño del objeto arrastrando la flecha roja o introduciendo un valor concreto. De forma predeterminada, la escala es uniforme, es decir, el objeto mantiene sus proporciones. Pulsa el botón Modo para activar o desactivar la escala no uniforme, lo que te permite cambiar el ancho, la profundidad y la altura por separado. Pulsa Restablecer para volver a la escala original.
Puedes aplicar las herramientas Girar, Mover y Escalar a varios objetos a la vez. Para realizar una selección múltiple, haz clic en el primer objeto y mantén pulsado hasta que empiece a temblar sobre la plataforma de impresión. Esto significa que el modo de selección múltiple está activo. Haz clic en otros objetos para añadirlos a la selección, o vuelve a hacer clic para eliminarlos.
Copiar objetos
Puedes imprimir varias copias del mismo objeto a la vez. Selecciona el objeto y pulsa Más → Clonar, y, a continuación, elige el número de copias que desees (incluido el modelo original). Todas las copias se distribuirán automáticamente sobre la plataforma (o sobre varias plataformas, si no caben en una sola).
Seleccionando la Impresora
Haz clic en el botón Impresora del menú superior para ver todas las impresoras que has añadido a Prusa Connect y su estado actual. Puedes utilizar EasyPrint para enviar archivos de impresión de forma remota a estas impresoras.
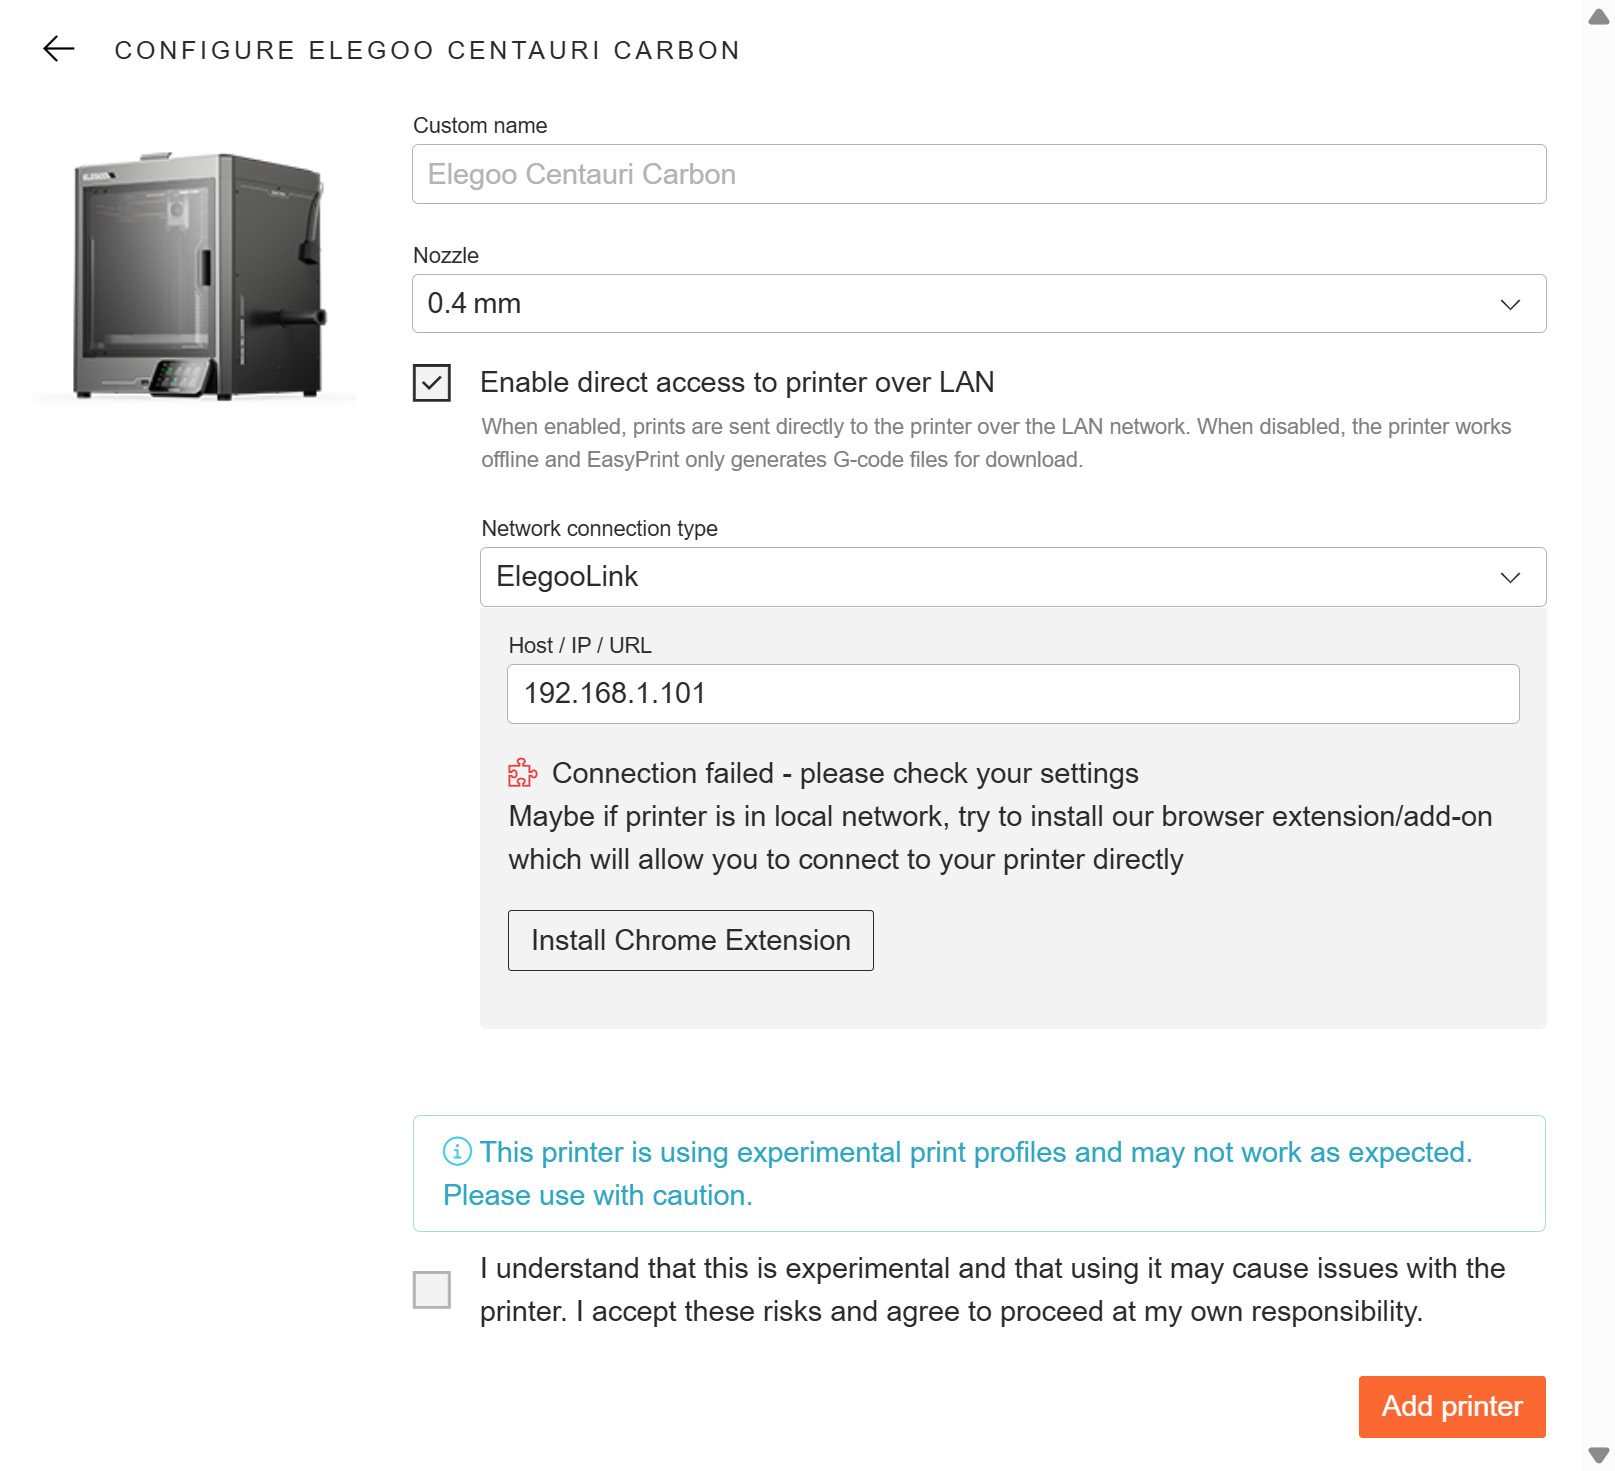
Si se utiliza EasyPrint a través de un navegador de escritorio (no móvil), también es posible enviar archivos de forma remota a impresoras que no sean de Prusa, mediante una conexión LAN, seleccionando la opción "habilitar el acceso directo a la impresora a través de LAN" en la configuración de la impresora que no sea de Prusa.
En este caso, es necesario seleccionar un tipo de conexión de red; existe la opción de instalar nuestra extensión de navegador para conectarse directamente a la impresora desde el navegador; nuestro menú de configuración ofrece esta opción.
Esta función no está disponible actualmente en nuestra aplicación Prusa ni en los navegadores móviles.
También puedes utilizar EasyPrint con impresoras Prusa que no estén registradas en Prusa Connect, o con impresoras que no sean de Prusa en modo sin conexión. Utiliza la opción Añadir impresora sin conexión para buscar el modelo exacto de tu impresora dentro de cada familia de productos. Si no utilizas la boquilla predeterminada, cambia el diámetro de la boquilla en las opciones de la impresora.

Seleccionando el Material
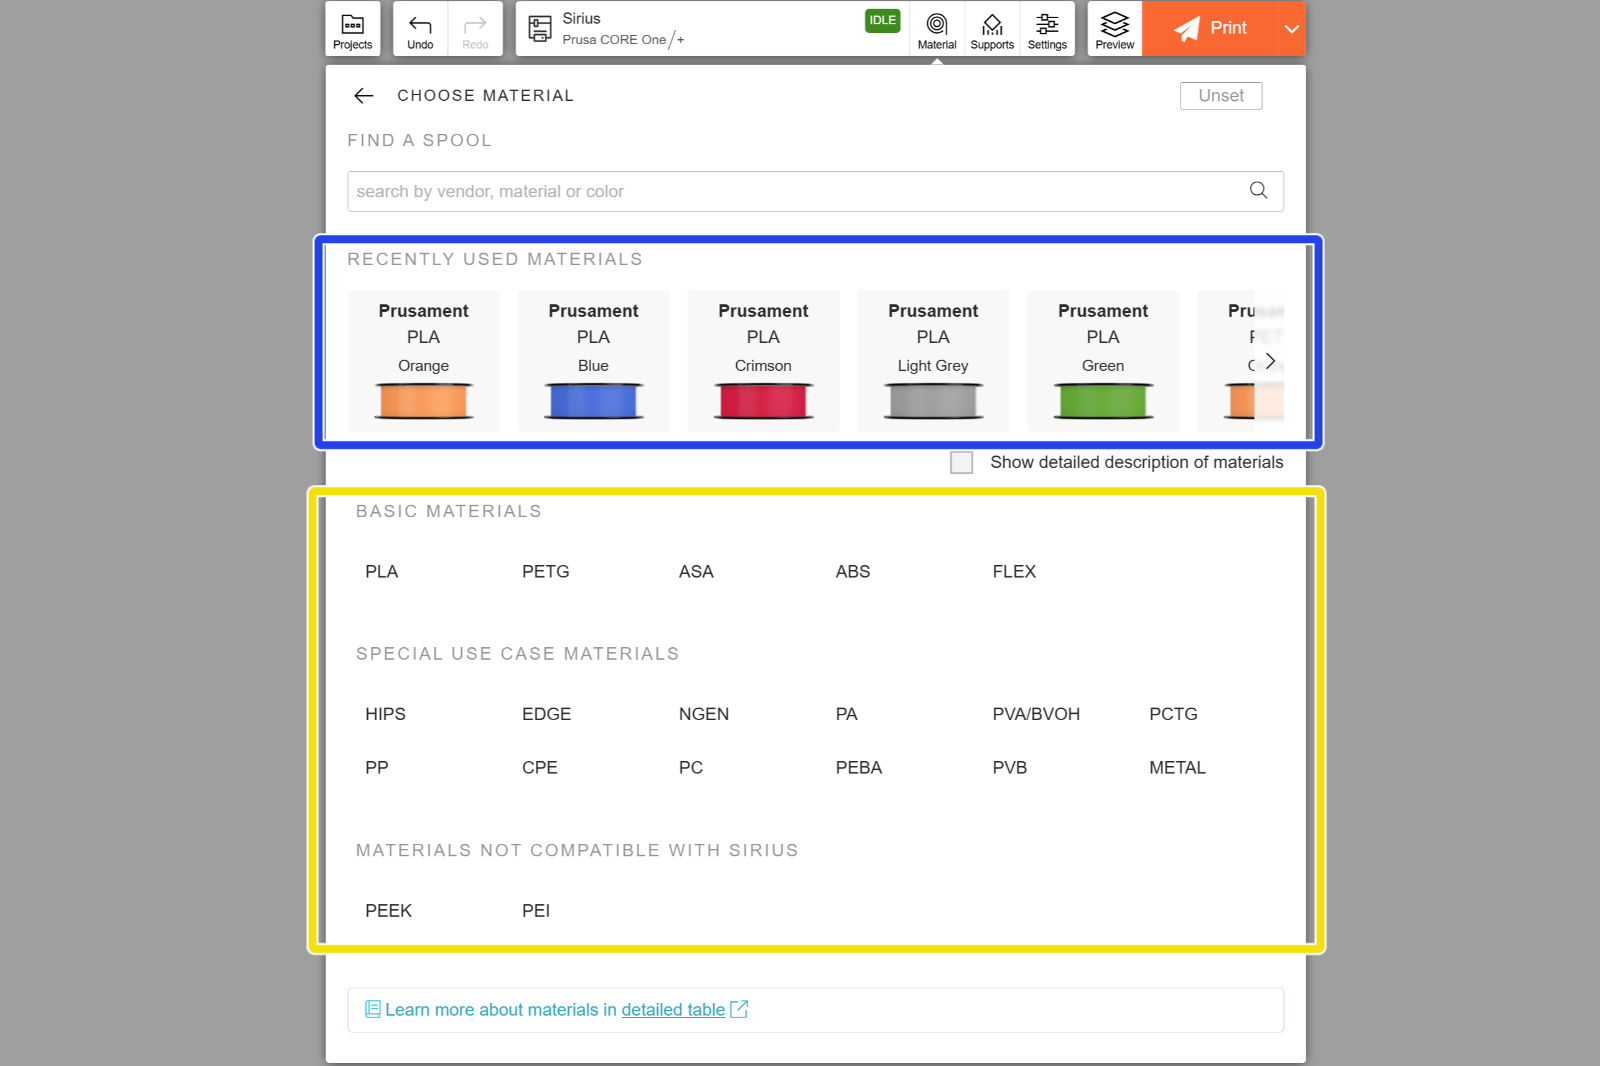
Abre la pestaña «Material» para especificar el material de impresión. La forma más rápida de seleccionar un material es utilizar la barra de búsqueda: puedes escribir el nombre del rollo de filamento concreto que tengas disponible, por ejemplo, "Prusament PLA Yellow". La biblioteca de materiales incluye una foto del color del material, que se refleja en la vista previa en 3D. Esto resulta útil para la pintura en color.
La pantalla de selección de materiales también muestra los materiales utilizados recientemente para facilitar el acceso. En lugar de buscar un color de filamento específico, puedes utilizar la lista situada en la parte inferior de la pestaña Material para seleccionar el tipo general (por ejemplo, PETG, etc.), y a continuación el fabricante y el subtipo (por ejemplo, Prusament - PETG con fibra de carbono). Si tu marca de filamento específica no aparece en la lista, utiliza uno de los perfiles genéricos para ese material.
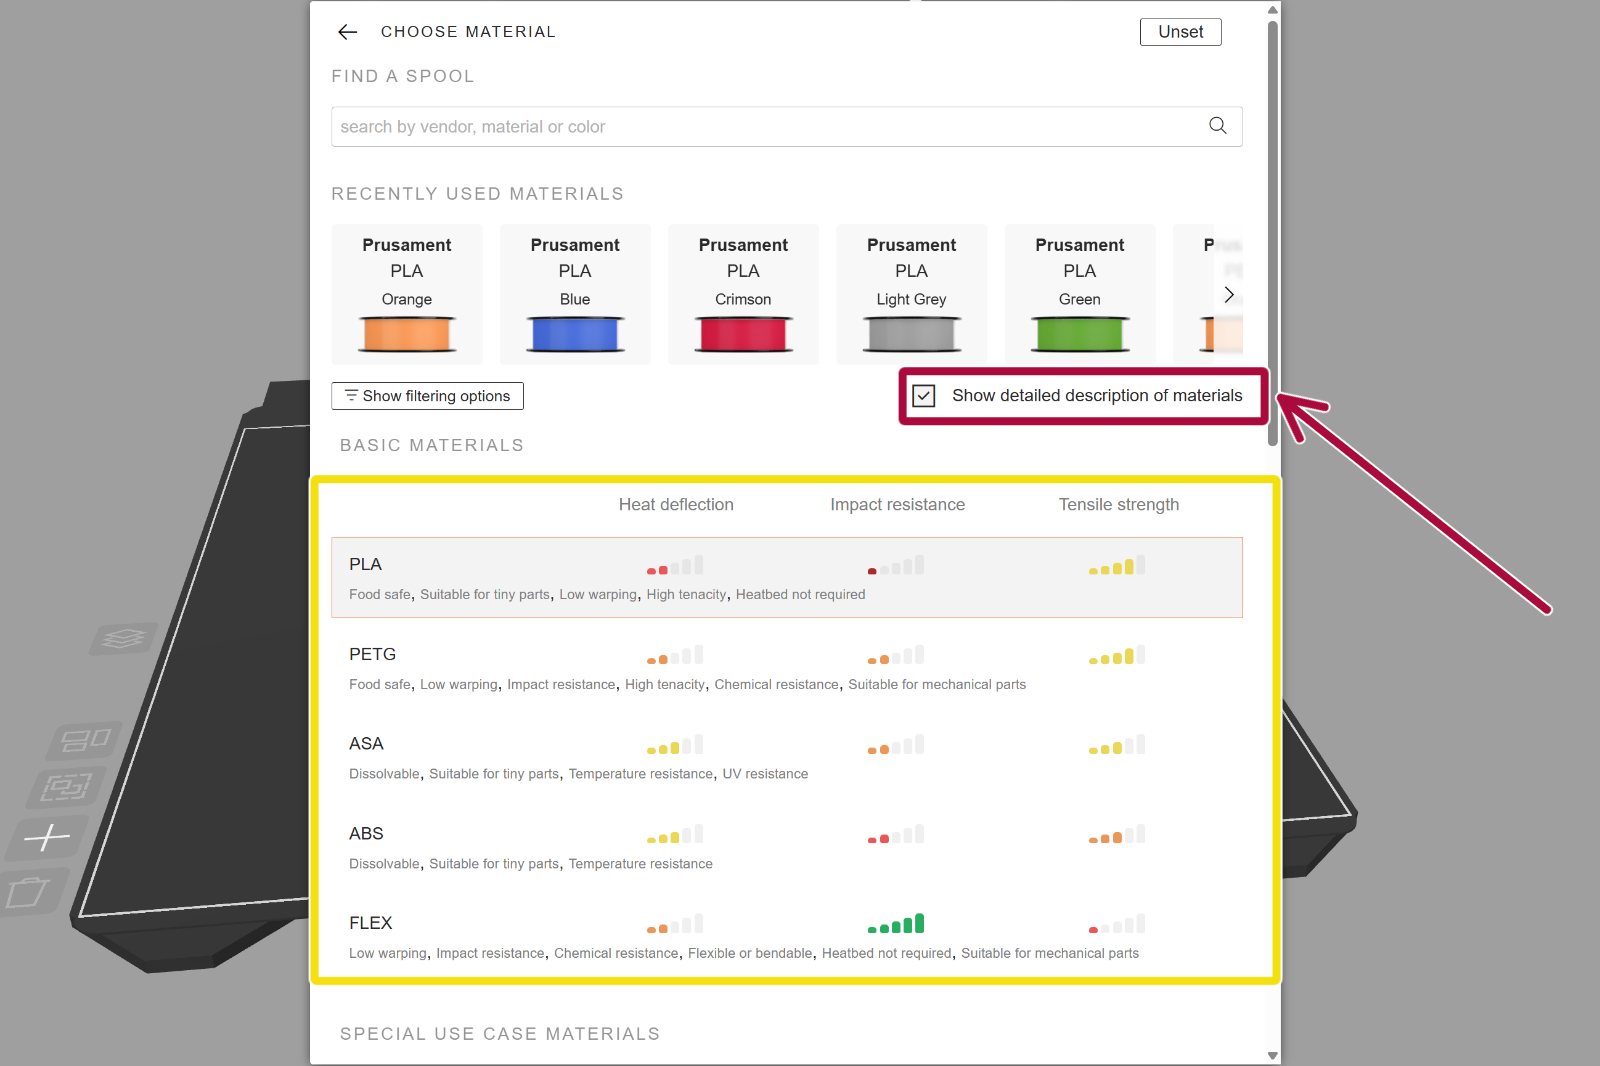
Marca la casilla "Mostrar descripción detallada de los materiales" para ver una breve descripción y una comparación de cada material. Esto te ayudará a elegir el filamento más adecuado para tu caso de uso específico.
Activando los Soportes y Aumentando la Adherencia
Debido a las características de la tecnología de impresión 3D, puede ser necesario utilizar una estructura de soporte debajo de aquellas piezas que, de otro modo, se imprimirían en el aire. Para un principiante, puede resultar difícil decidir cuándo son necesarios estos soportes. Por lo general, si no estás seguro, lo más seguro es activarlos mediante la opción En todos los sitios - Orgánico. Cada opción incluye una imagen que ilustra el tipo de soportes que genera.
Muchos modelos creados específicamente para la impresión 3D están diseñados de tal manera que no requieren soportes. Esto resulta útil, ya que los soportes exigen más tiempo de impresión y material. Consulta la descripción del modelo en cuestión, donde los autores suelen ofrecer consejos sobre cómo activar los soportes.
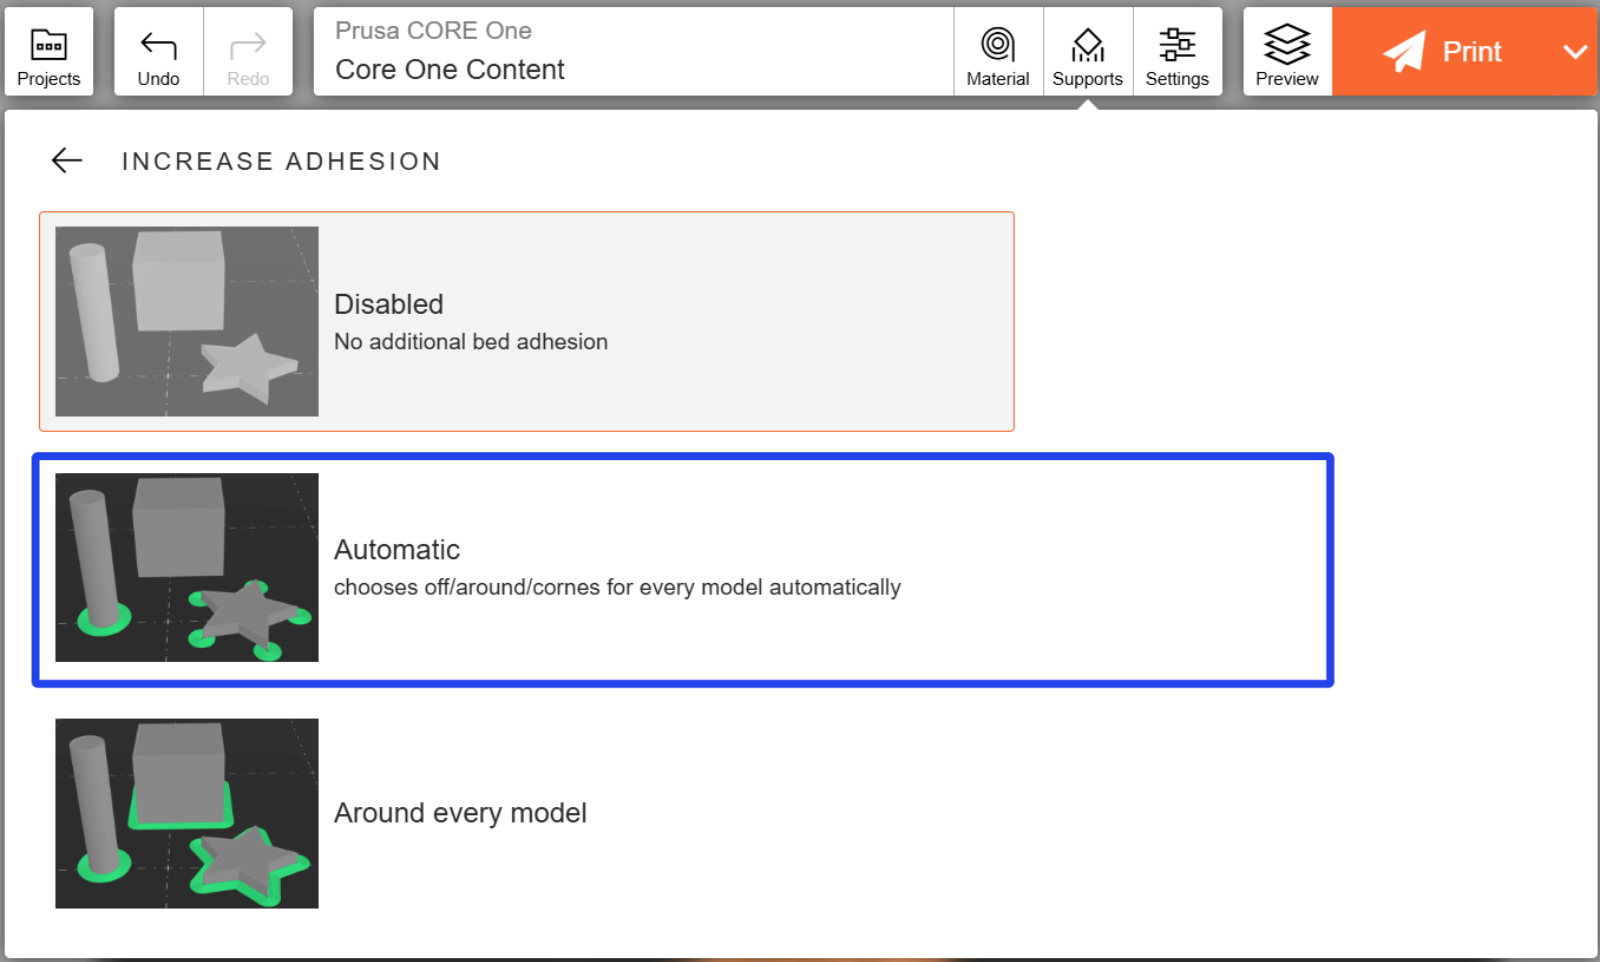
Los objetos con una base pequeña pueden desprenderse accidentalmente de la lámina de impresión durante el proceso. Si activas Incrementar adherencia - automático, EasyPrint añadirá automáticamente pequeños rebordes (es decir, una fina capa de material que se puede retirar fácilmente tras la impresión) a los objetos que lo necesiten.
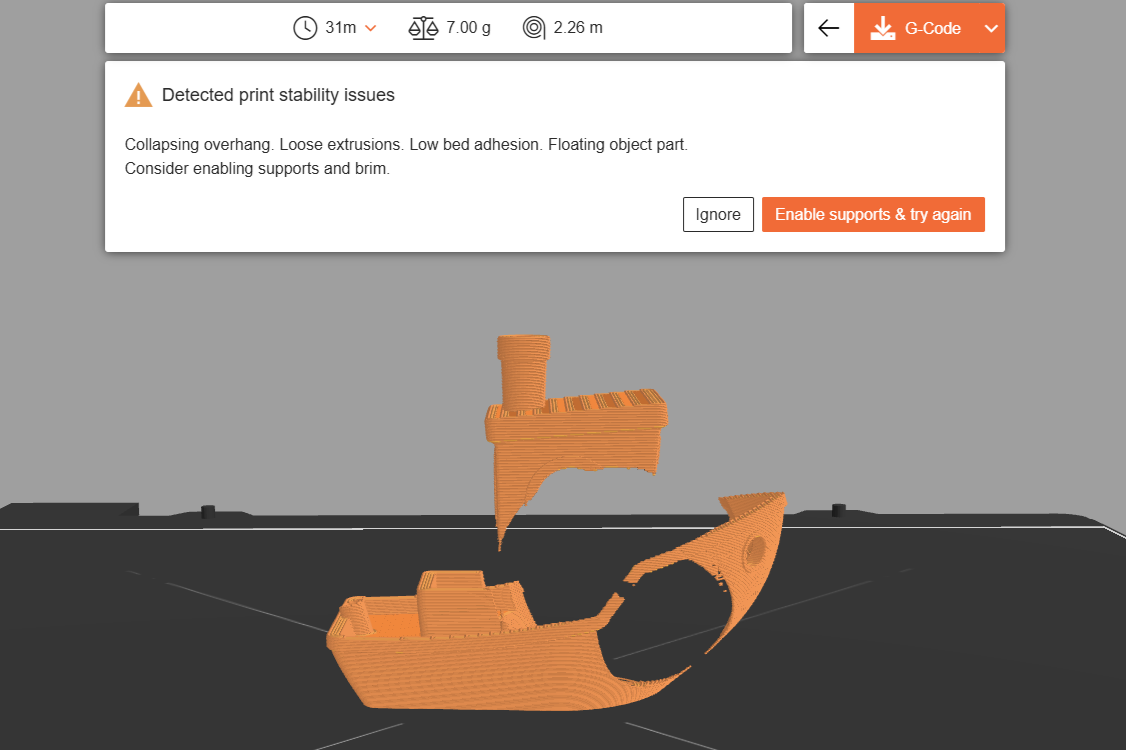
EasyPrint también detecta automáticamente posibles problemas durante el proceso de laminado y sugiere utilizar soportes o aumentar la adhesión si no están activados.
Ajustando la configuración de impresión
En la pestaña Configuración, selecciona uno de los perfiles de impresión. El perfil Equilibrado ofrece un buen equilibrio entre calidad y velocidad de impresión para la mayoría de los casos de uso.
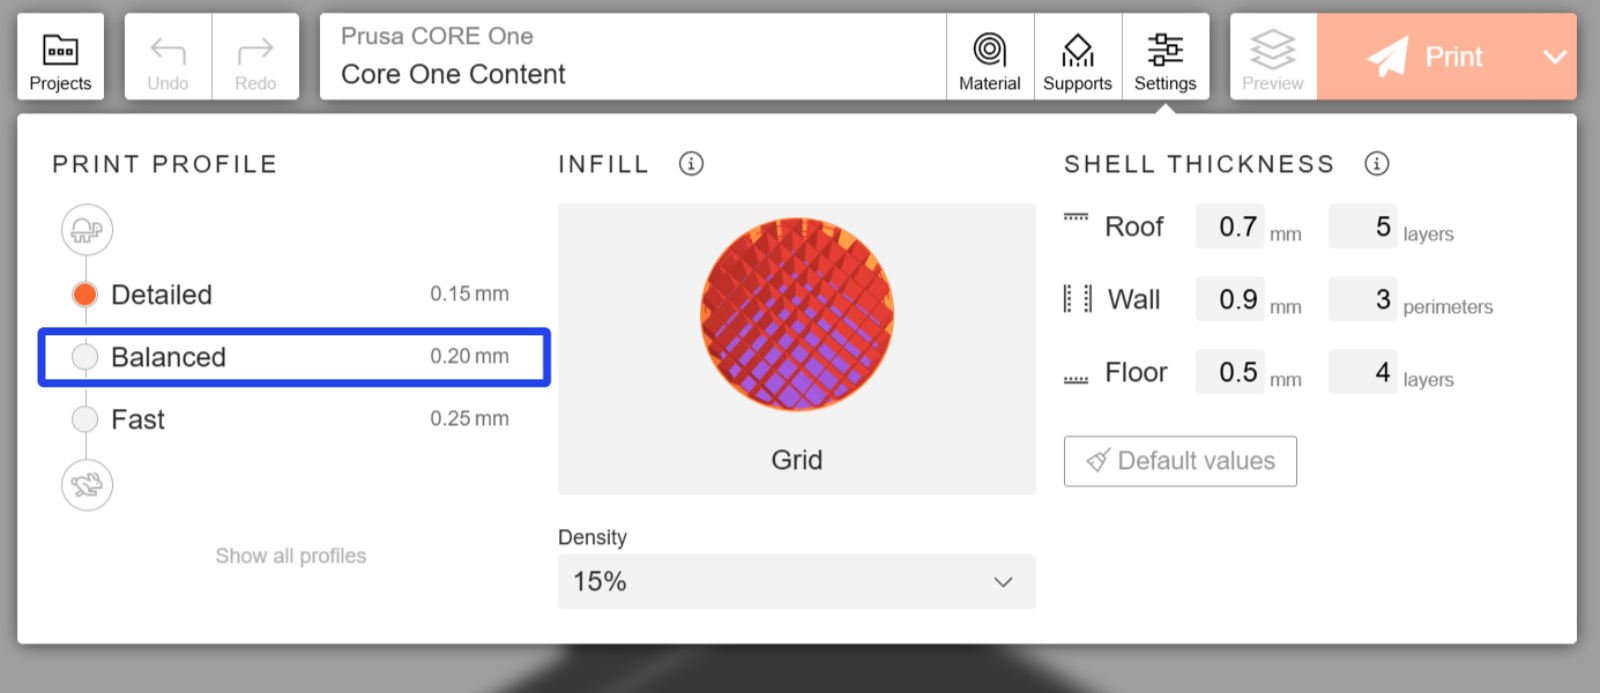
También puedes ajustar algunos parámetros, como el patrón de relleno (es decir, la estructura interna del modelo impreso). Los patrones se dividen en varias categorías, según su velocidad de impresión o su resistencia.
Imprimiendo
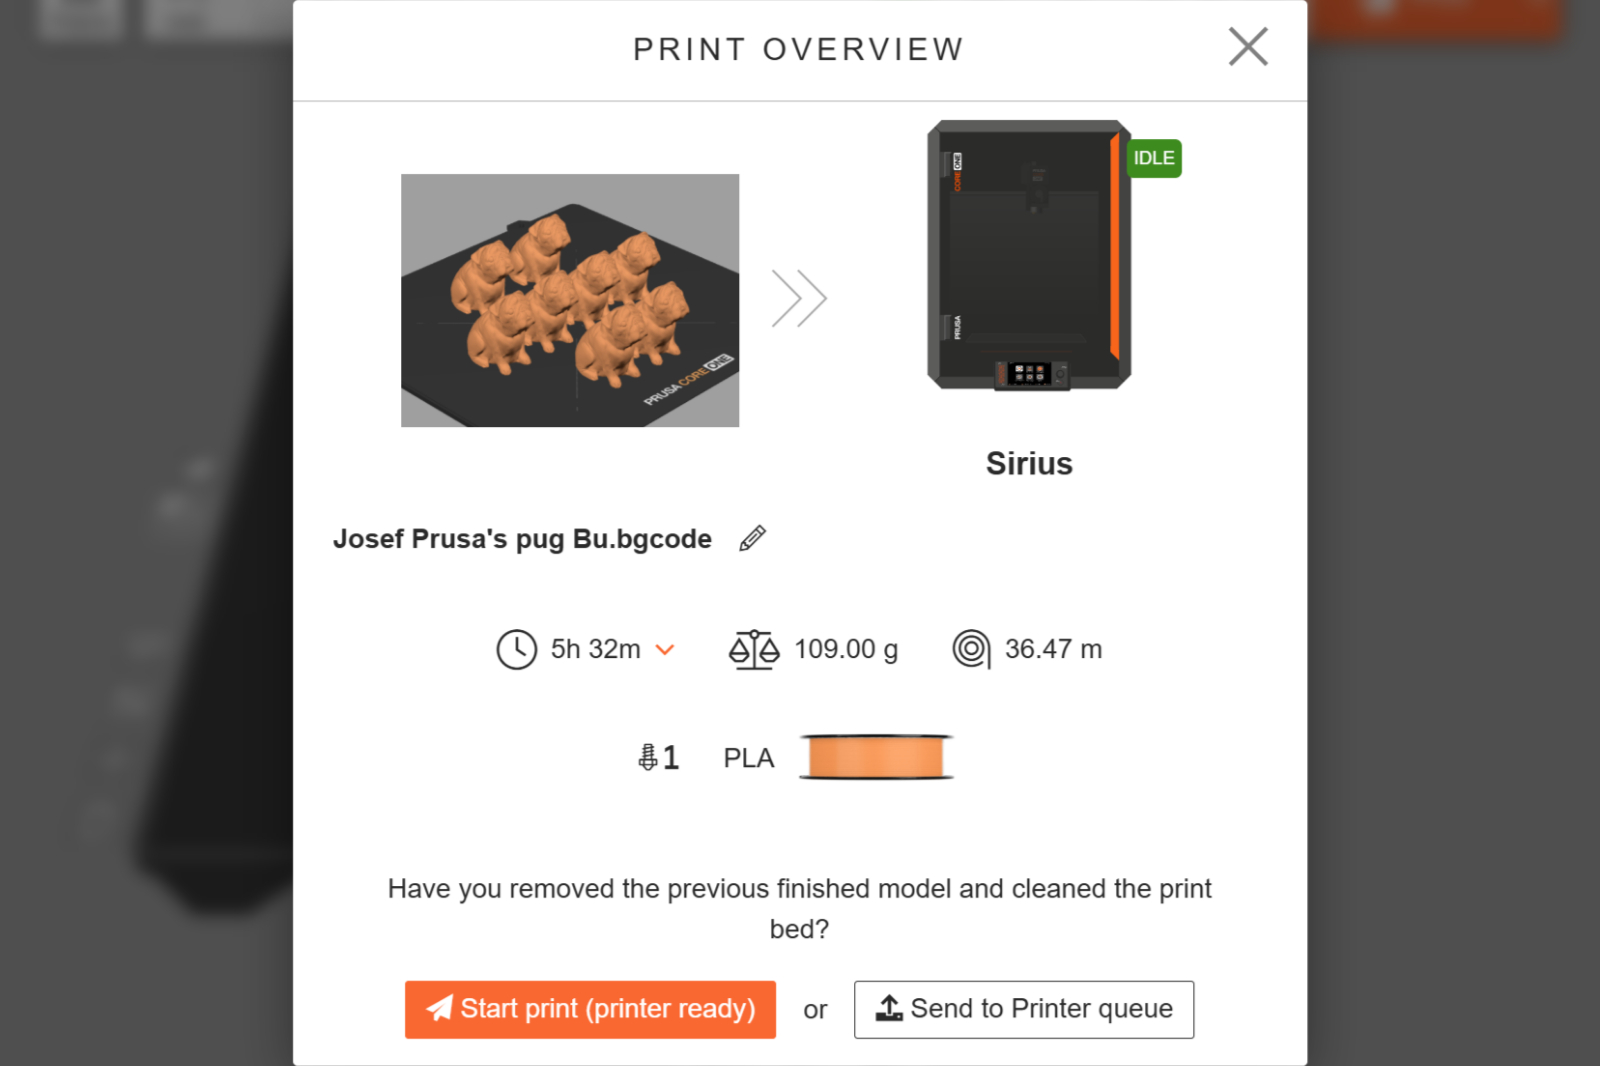
Una vez que hayas configurado todo, haz clic en Imprimir. Esto enviará tu proyecto a servidores remotos para su laminado. Dependiendo de la complejidad de tu proyecto y del tamaño de la cola, esto puede tardar un minuto.
Una vez finalizado el laminado, aparecerá la pantalla Print Overview, en la que se mostrarán el tiempo de impresión y los gramos y metros de filamento que consumirá la impresión. Si tu impresora está inactiva en ese momento y cuenta con el material adecuado, puedes comenzar a imprimir de inmediato. De lo contrario, el código G se añadirá a la cola de impresión.
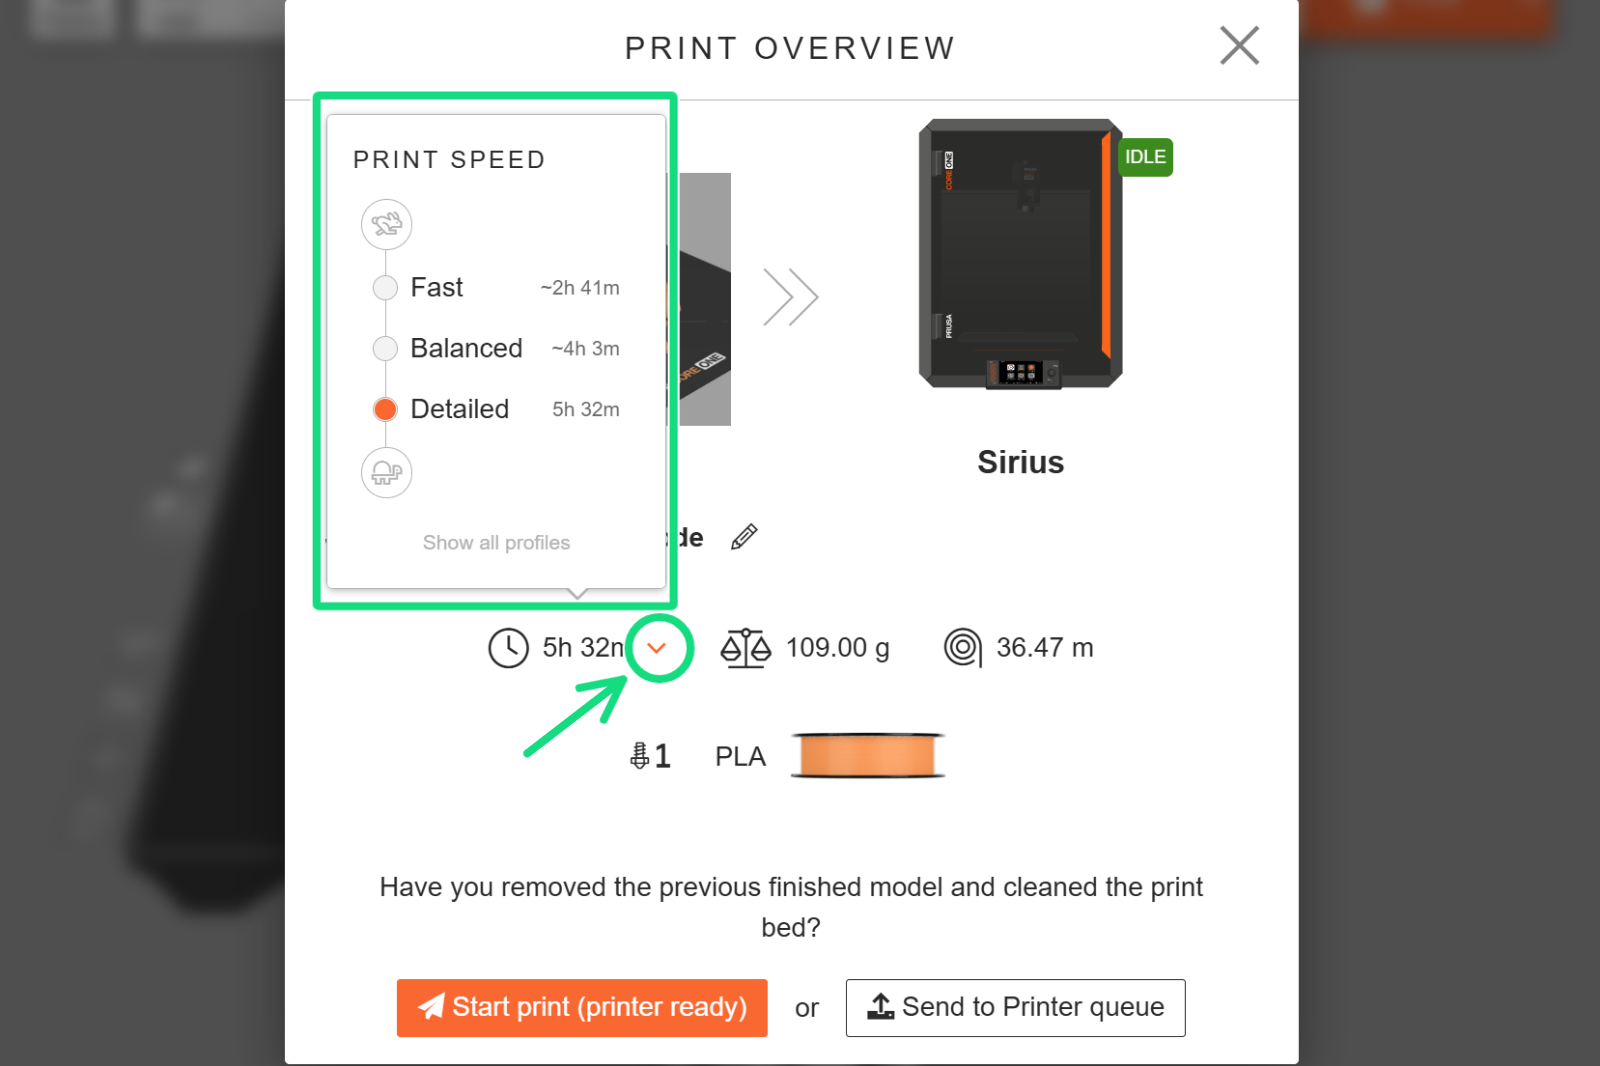
Puedes pulsar la flecha del menú desplegable situada junto a la estimación del tiempo de impresión para ver una comparación rápida del tiempo de impresión con otros perfiles de impresión. Selecciona uno de los perfiles para volver a laminar el proyecto.
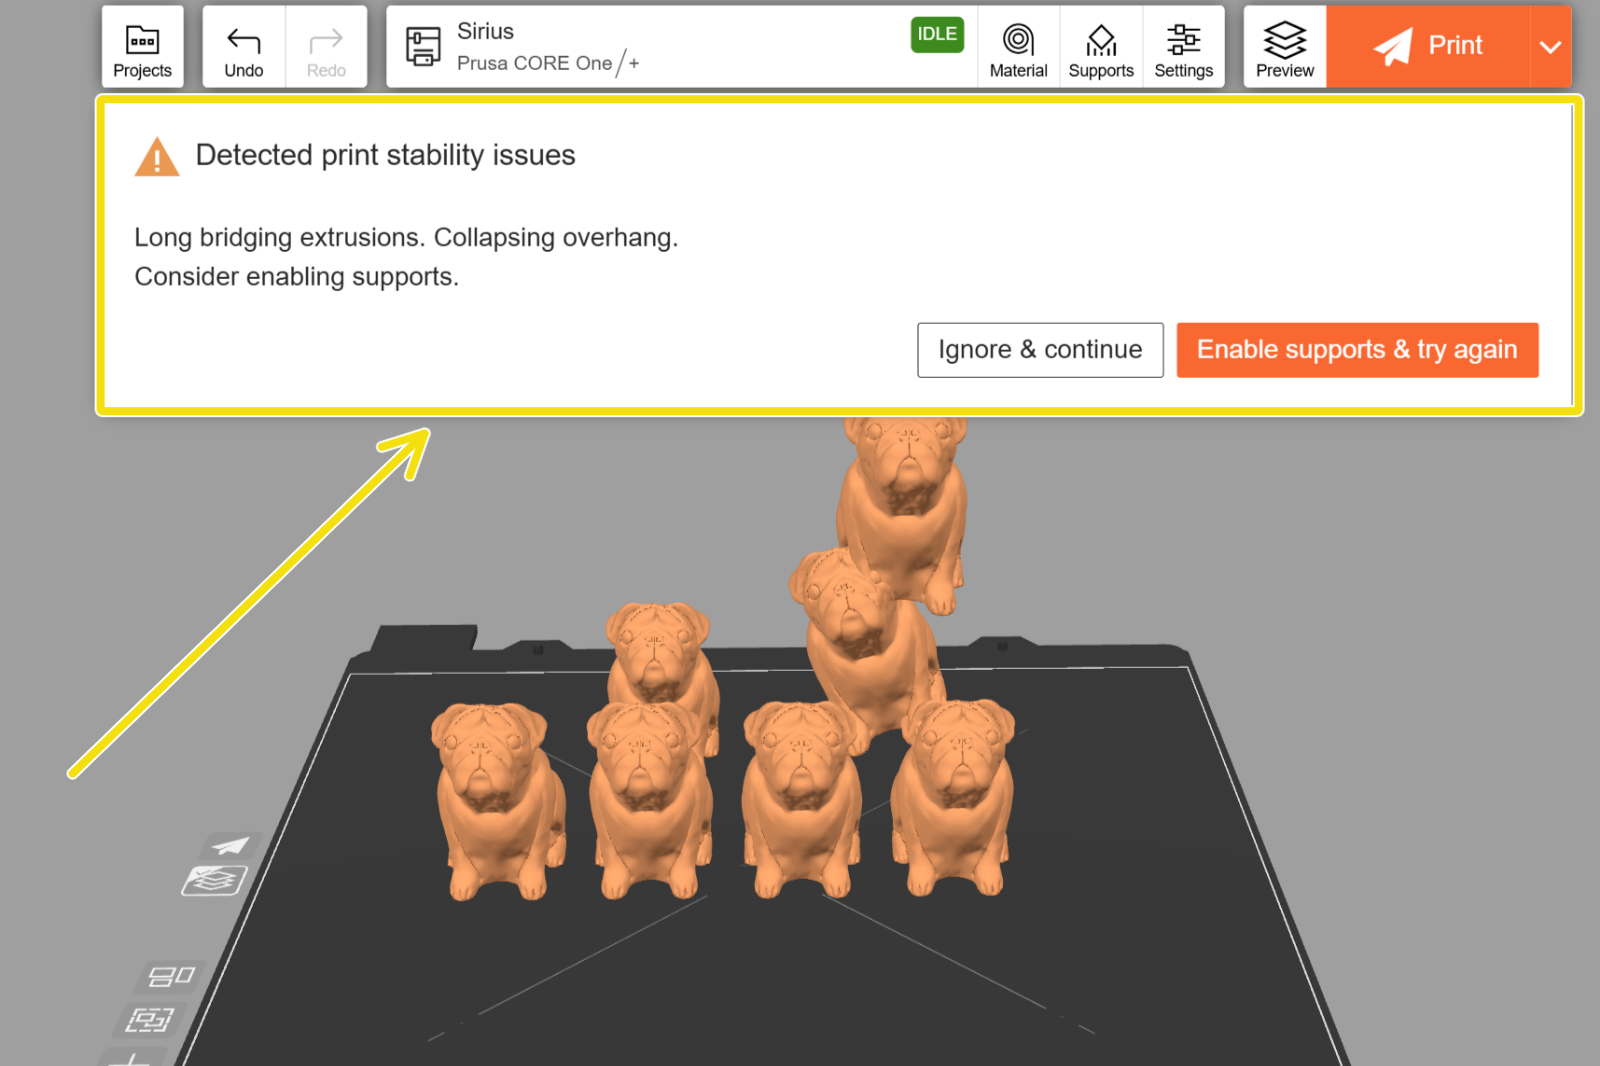
Cuando EasyPrint detecta un posible problema con la impresión, muestra una pantalla de advertencia en la que se describe el problema. A menos que el modelo esté diseñado específicamente para imprimirse sin soportes, por lo general es más seguro seleccionar "Activar soportes e intentarlo de nuevo". También puedes hacer clic en Ignorar y continuar para continuar con la configuración actual.
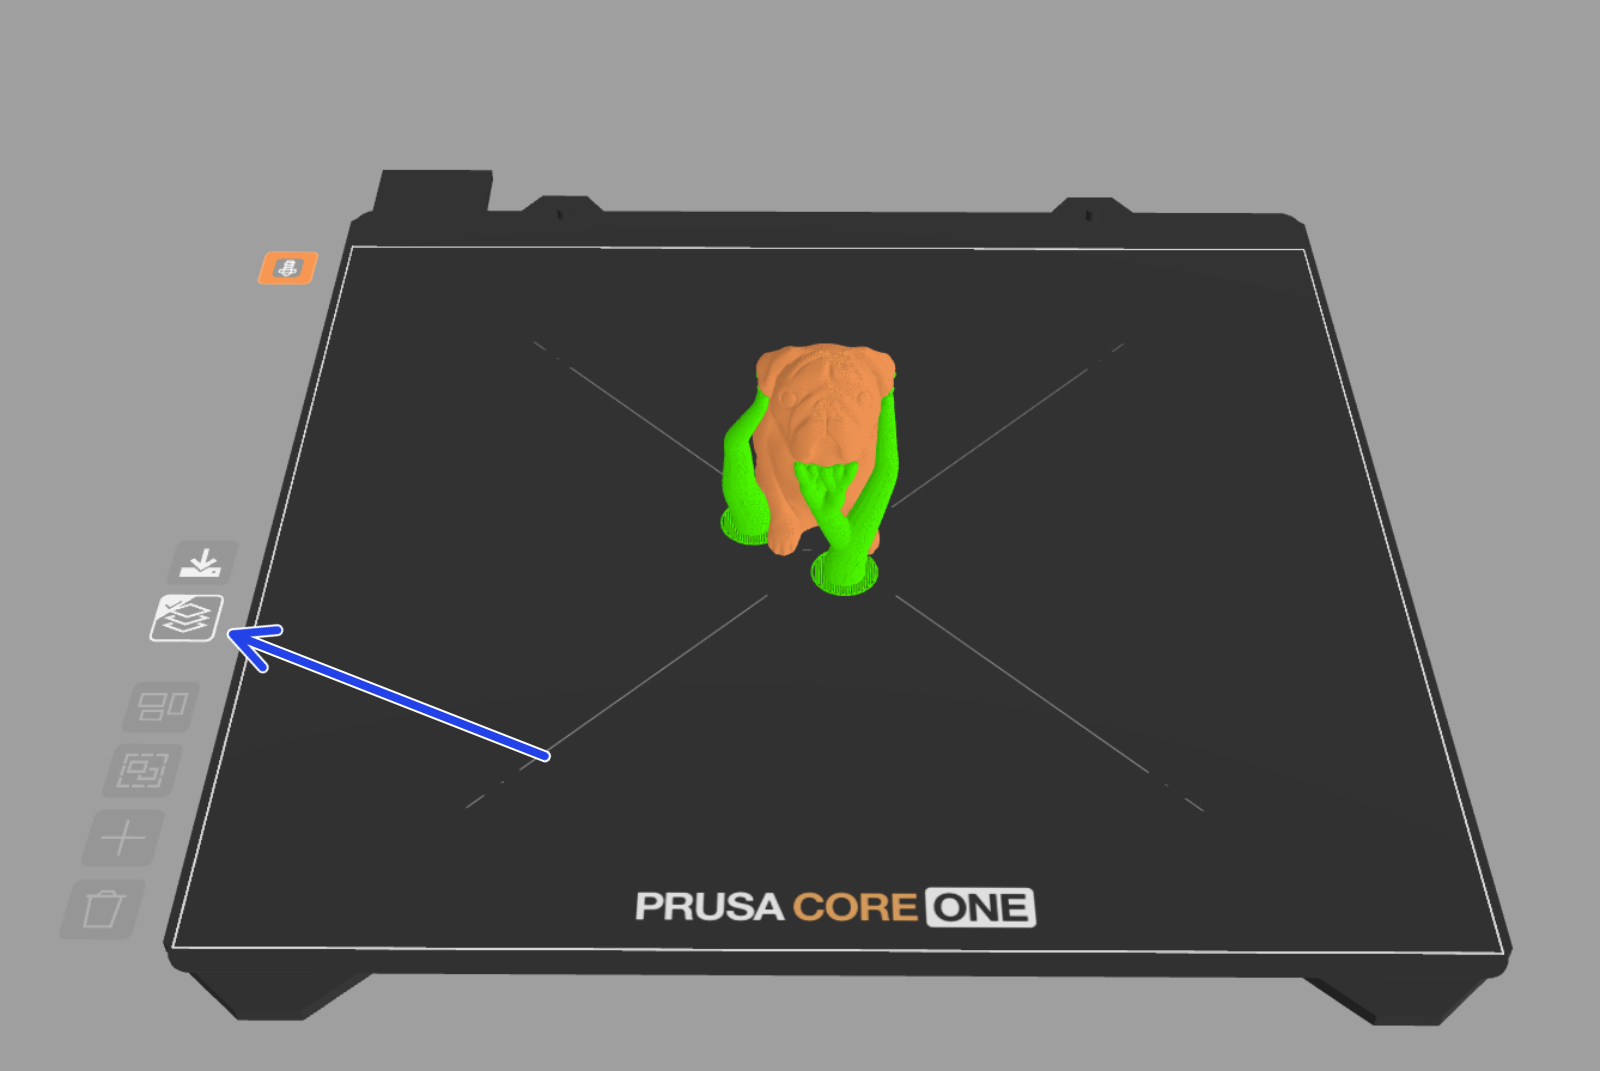
Si lo deseas, puedes ver la vista previa del código G. La vista previa incluye los soportes generados (que se muestran en verde) y es una buena forma de realizar una comprobación final antes de imprimir.
Para garantizar un uso equitativo para todos los usuarios, se ha establecido un límite de tiempo de 60 segundos por cama para el laminado, lo que debería ser suficiente para el 95% de los proyectos. En el caso de trabajos extremadamente complejos, puedes descargar el archivo del proyecto y laminarlo localmente en tu ordenador con PrusaSlicer, o bien aprovechar la Prusa Subscription, que incluye límites de laminado más amplios.
Herramienta de Corte
La herramienta de Corte divide un objeto en dos objetos independientes a lo largo de un plano horizontal. Esto puede utilizarse para dividir un modelo de gran tamaño en varias piezas que quepan en una bandeja de impresión más pequeña; para crear una base plana para la impresión; o simplemente para eliminar partes innecesarias de un modelo.
Para utilizar la herramienta, selecciona un objeto y pulsa Más → Cortar. Se mostrará una vista previa transparente del plano de corte. Puedes utilizar el cursor para arrastrar el plano hacia arriba y hacia abajo, o usar las flechas redondeadas para girar el plano. Existe la opción de dividir el modelo (lo que lo separa en dos objetos, que se disponen automáticamente), o de cortar En su sitio (las piezas permanecen donde están, formando parte de un mismo grupo de objetos). Pulsa en Aplicar para confirmar el corte.
A diferencia de PrusaSlicer, la herramienta de corte de EasyPrint conserva las propiedades de los objetos, como el color o el acabado difuminado. Sin embargo, la herramienta de corte de PrusaSlicer incluye una opción para añadir conectores personalizados al corte, lo cual resulta útil para el montaje de las piezas impresas.
Trabajando con Grupos
Los modelos compuestos por varias piezas (mallas) se cargan en EasyPrint como un grupo. Todos los objetos del grupo se moverán, escalarán y cortarán juntos como un único objeto. En el panel Modelos, puedes examinar las piezas individuales que componen el grupo. Cada una de ellas se puede separar del grupo o eliminar por separado. También puedes hacer doble clic en una pieza del modelo situada en la plataforma de impresión para separarla manualmente.
Si mueves un objeto de modo que toque a otro, ambos se fusionarán automáticamente en un grupo. Puedes desmontar el grupo en el panel Modelos.
Convirtiendo un Objeto en un Agujero
Un objeto dentro de un grupo se puede convertir en un Agujero, lo que elimina cualquier geometría que se solape. Esto puede resultar útil para crear pequeños orificios o eliminar partes de objetos cuando la herramienta de Cortar habitual no funciona bien.
Haz doble clic en un objeto dentro de un grupo para seleccionarlo. A continuación, en la pestaña Asignación de colores, selecciona Agujero. La vista previa en 3D se actualizará para mostrar el objeto con colores transparentes y eliminará cualquier parte que se solape. Más adelante, puedes convertir el Agujero en un objeto normal utilizando la opción Sólido dentro de la pestaña Asignación de colores.
El Agujero se puede mover como cualquier otro objeto, y la vista previa se actualizará en tiempo real.
La herramienta de Agujero puede generar en ocasiones geometría no imprimible. Recomendamos revisar la vista previa del código G para confirmar que el objeto sea realmente imprimible. EasyPrint también detectará automáticamente los problemas más graves y te avisará antes de imprimir.
Trabajando con Varias Bases
En EasyPrint puedes trabajar sin problemas con varias plataformas virtuales. Todas las plataformas comparten los mismos ajustes de impresión, pero cada una se lamina por separado y genera su propio archivo de impresión. Esto puede resultar útil para proyectos de gran envergadura con muchas piezas. Si los objetos de tu lista de impresión no caben en una sola plataforma, se distribuirán automáticamente entre varias plataformas.
También puedes arrastrar cualquier objeto al espacio vacío y aparecerán nuevas bases de forma dinámica. Una vez que sueltes el objeto, la base que haya debajo permanecerá en su sitio.
Puedes enviar un objeto a otra cama concreta seleccionándolo, pulsando Más → Mover a y seleccionando la base de destino. Por defecto, los objetos de la base de destino se ordenan automáticamente; esto se puede desactivar mediante la casilla de verificación de esta pantalla de menú. "Nueva base" creará otra cama vacía para el objeto.
Siempre hay una base activa, lo cual se puede distinguir por su color sólido (las bases inactivas son semitransparentes). Haz clic en una base inactiva para activarla. Al abrir el menú desplegable, puedes elegir entre imprimir todas las bases o solo la que está activa en ese momento.
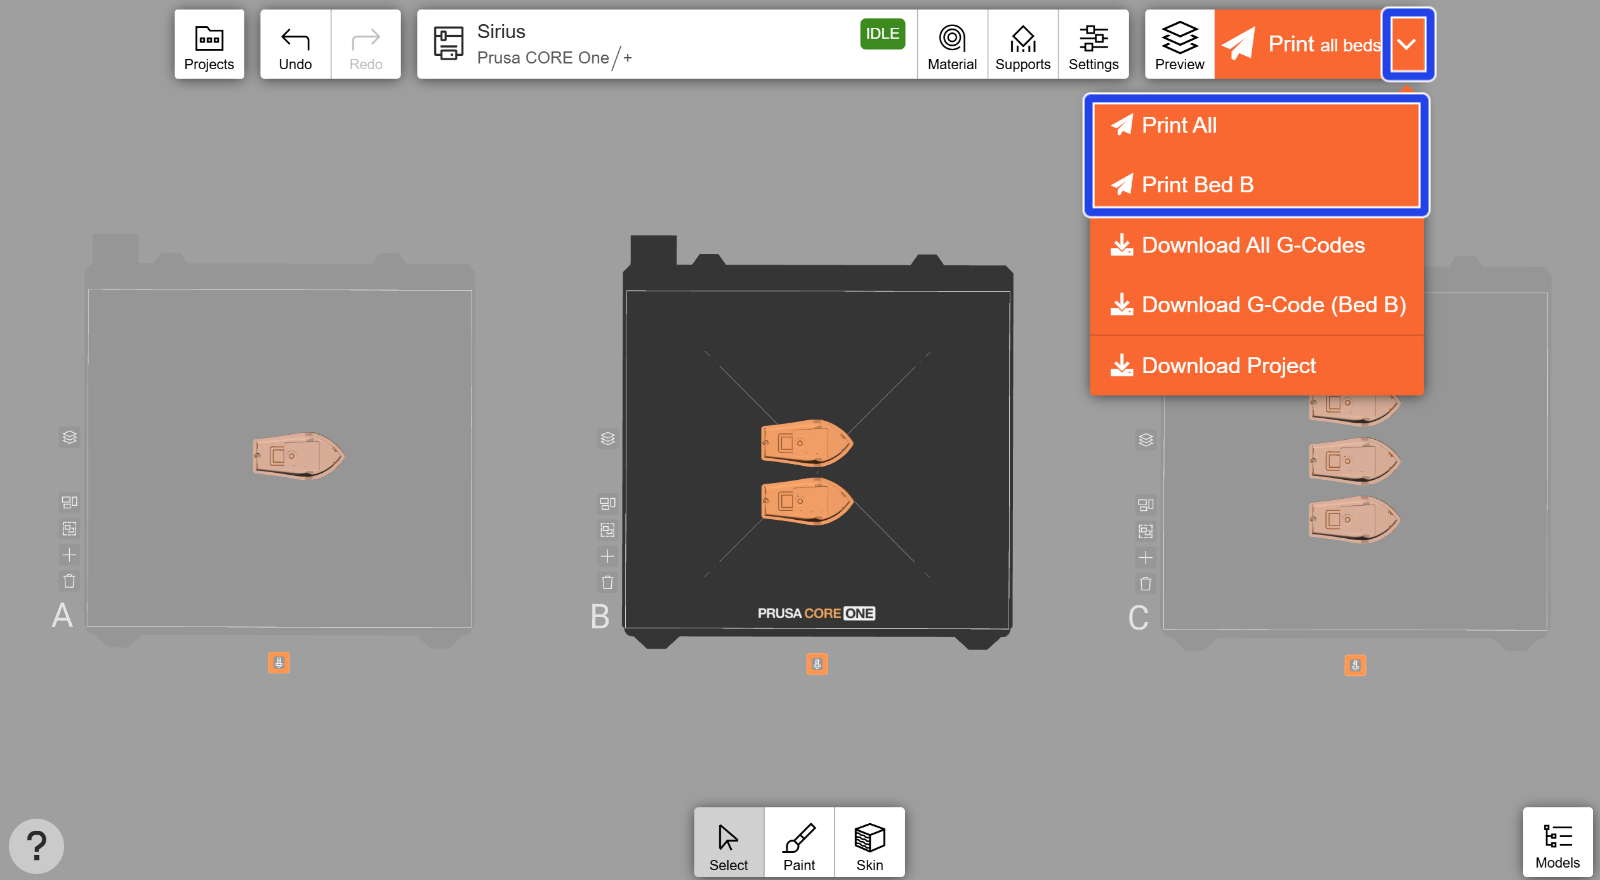
Si eliges laminar todas las bases de una sola vez, se laminarán una tras otra. Las cuentas con una Prusa Subscription activa tienen acceso al laminado paralelo prioritario.
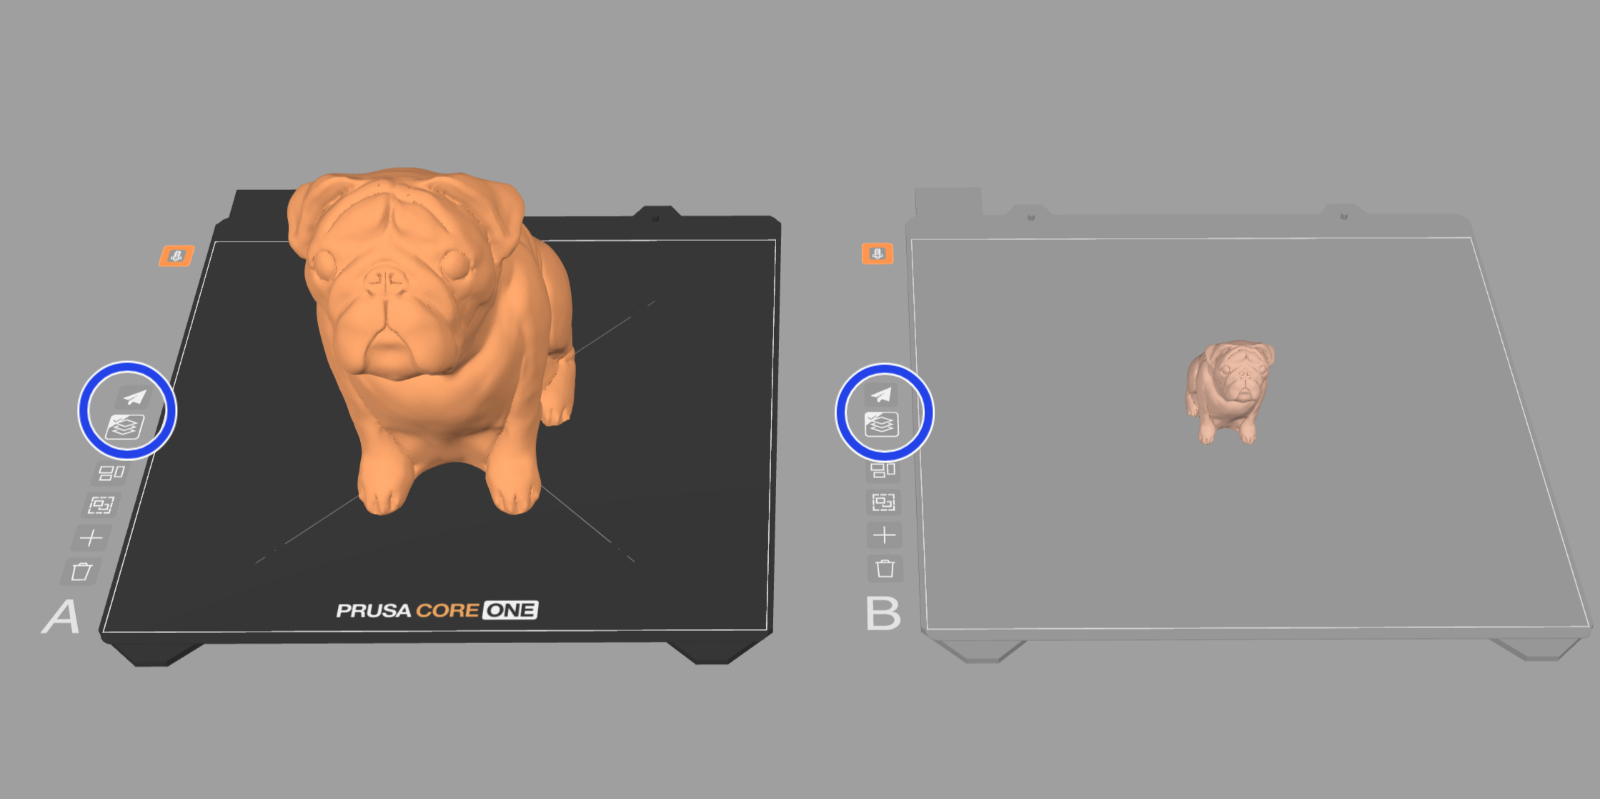
Si el icono de Vista previa situado a la izquierda de cada base muestra una marca de verificación en la esquina, significa que la base ya se ha laminado. El botón situado encima te permite enviar rápidamente el archivo a la impresora (o descargar el código G, dependiendo de la impresora seleccionada)..
Ver y Descargar Proyectos
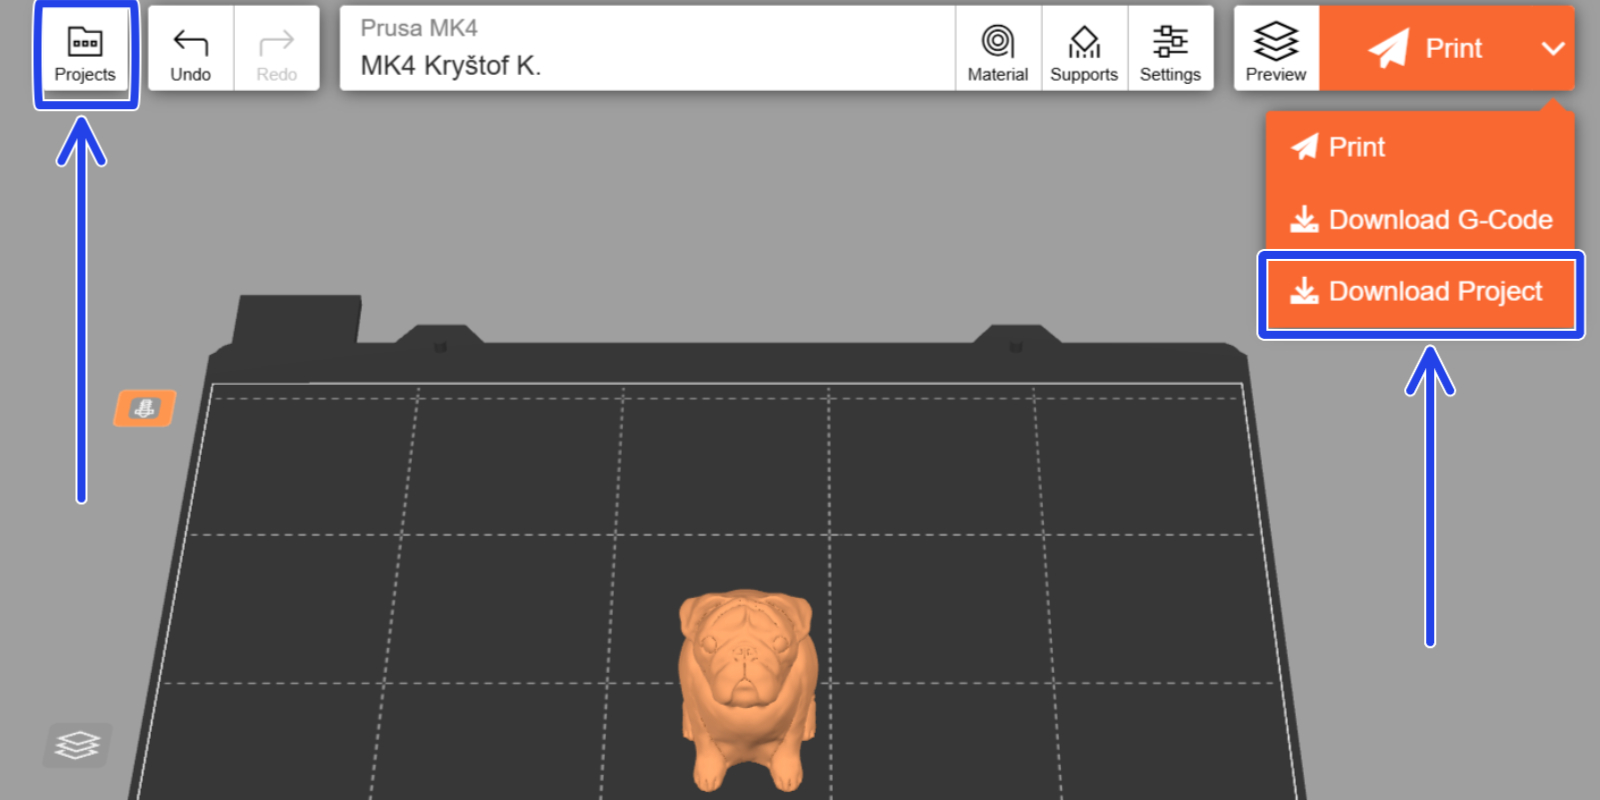
Puedes descargar el proyecto actual como archivo 3MF mediante el menú desplegable naranja. Esto puede resultarte útil si deseas ajustar tu proyecto en PrusaSlicer o compartirlo con otra persona. También puedes acceder a proyectos anteriores a través de la pestaña Proyectos.
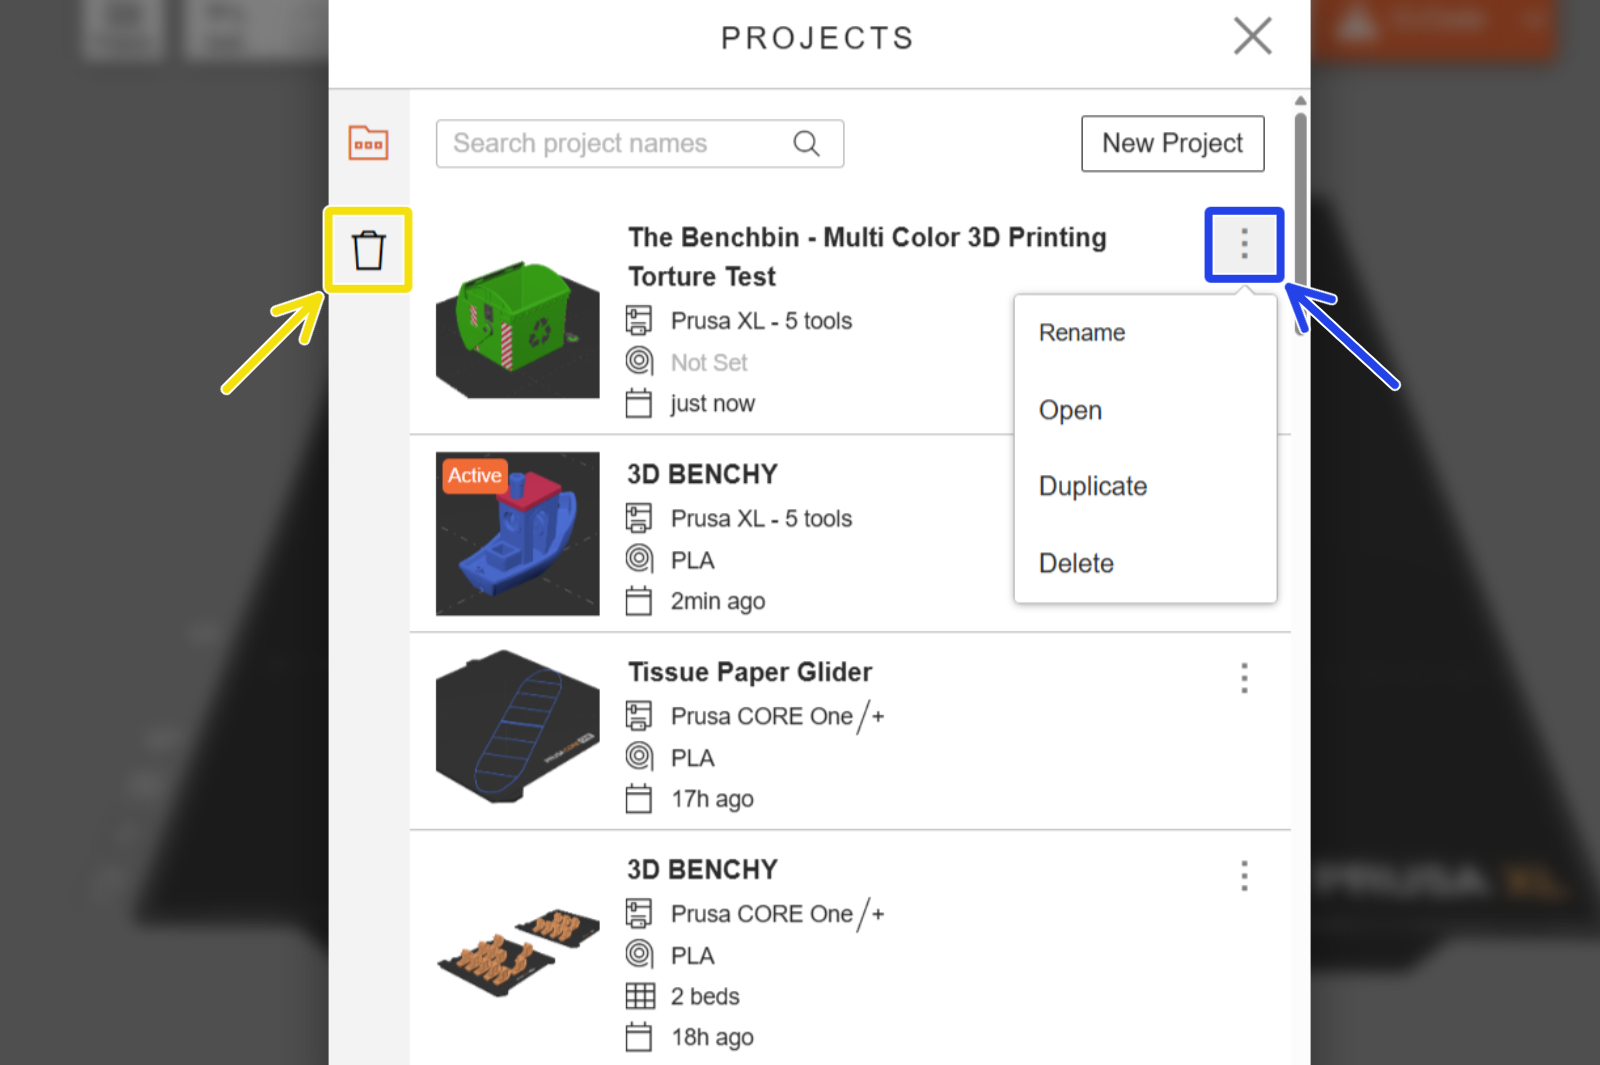
En la pestaña Proyectos, haz clic en los tres puntos para cambiar el nombre, abrir, duplicar o eliminar un proyecto. Los proyectos eliminados se conservan durante 30 días en la carpeta Proyectos eliminados (a la que se accede haciendo clic en el icono de la papelera), a menos que se eliminen manualmente.
Los proyectos de EasyPrint se guardan automáticamente en el almacenamiento en la nube vinculado a tu Prusa Account. Puedes empezar a trabajar en un proyecto en un dispositivo y estará disponible también en tus otros dispositivos. Incluso tengas el mismo proyecto abierto en dos dispositivos diferentes al mismo tiempo (por ejemplo, en tu teléfono y en un ordenador), cualquier cambio que realices se reflejará casi al instante en el otro dispositivo.
Archivos de Usuario y Almacenamiento en la Nube
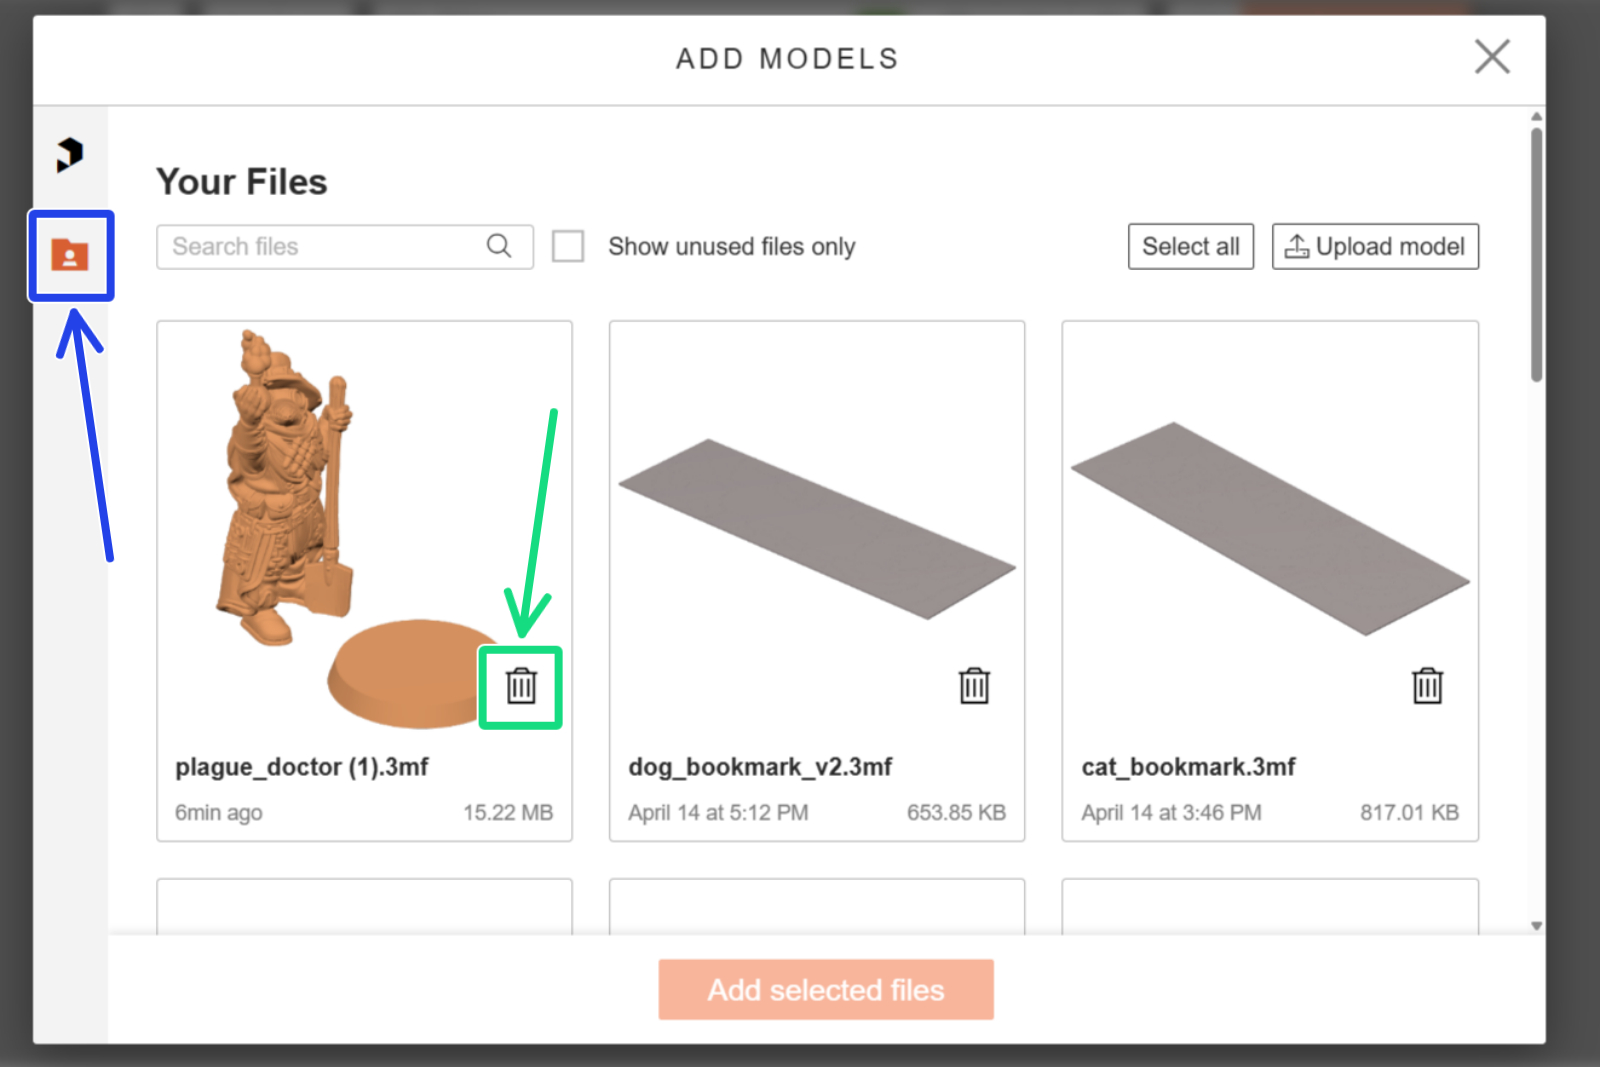
Al igual que ocurre con los Proyectos, los archivos que subas a EasyPrint estarán disponibles en todos los dispositivos. Puedes verlos seleccionando el icono de la carpeta en el menú Añadir modelos (el icono con el signo más situado junto a la plataforma de impresión). Puedes reutilizar estos archivos en tantos proyectos de EasyPrint como desees. Los archivos almacenados de esta forma cuentan para el límite de almacenamiento en la nube (véase más abajo). Para liberar espacio de almacenamiento, puedes eliminar algunos de tus archivos utilizando el icono de la papelera.
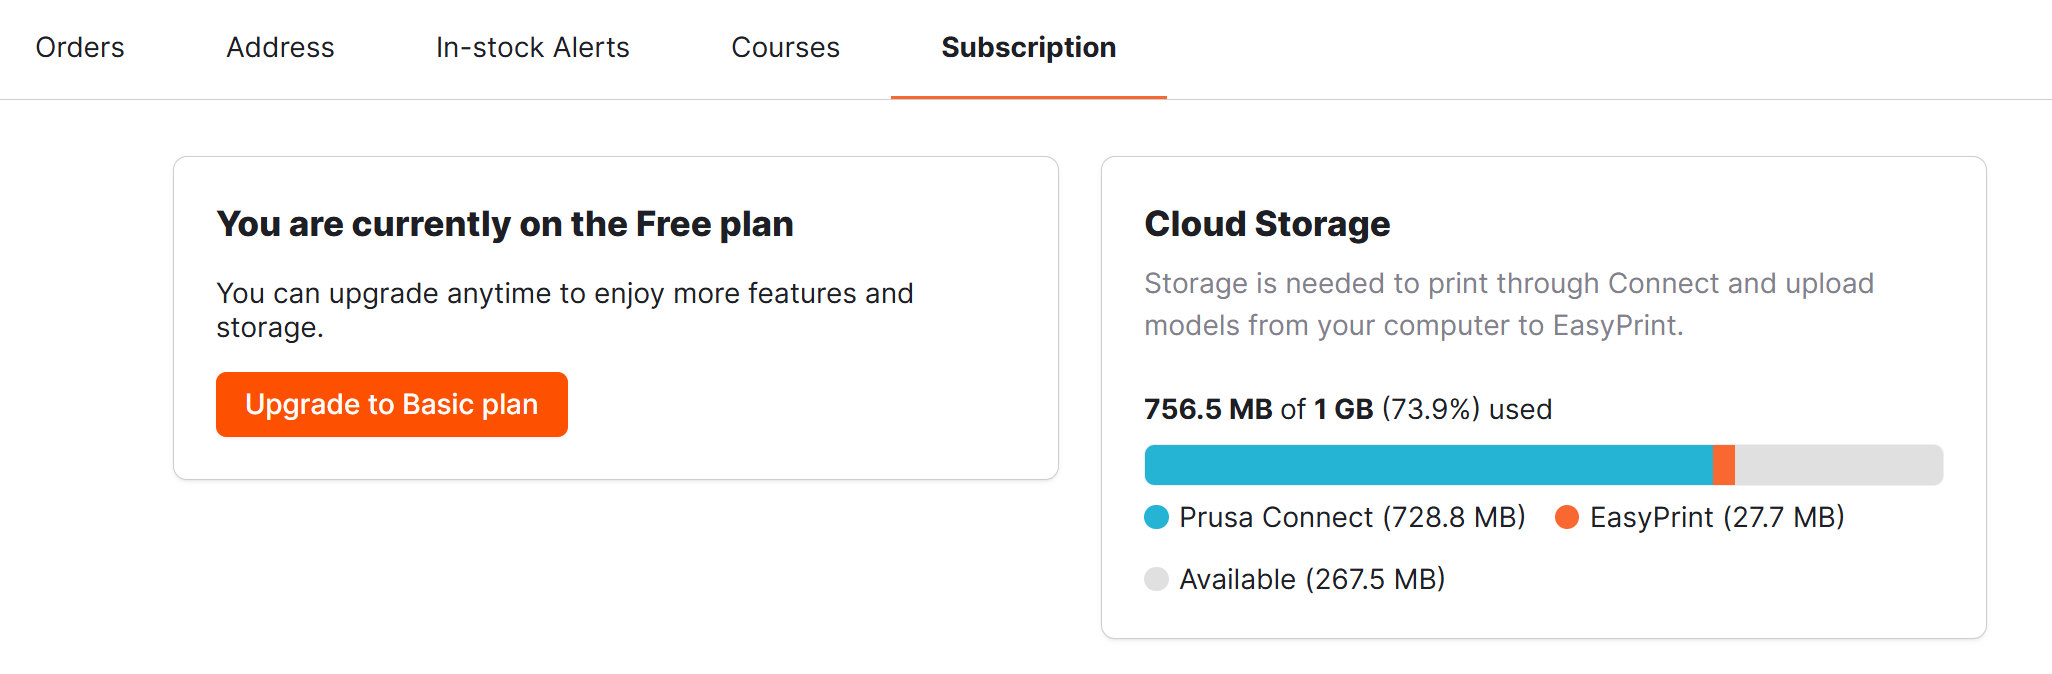
Cada cuenta de Prusa tiene acceso a 1 GB de almacenamiento en la nube, que se comparte tanto para Prusa Connect como para EasyPrint. El almacenamiento de EasyPrint se consume al subir modelos desde tu dispositivo. Los proyectos que utilizan modelos de Printables no cuentan para el límite de almacenamiento. Puedes consultar el uso actual en tu vista general de la Prusa Account.
Pintando y Asignando Colores
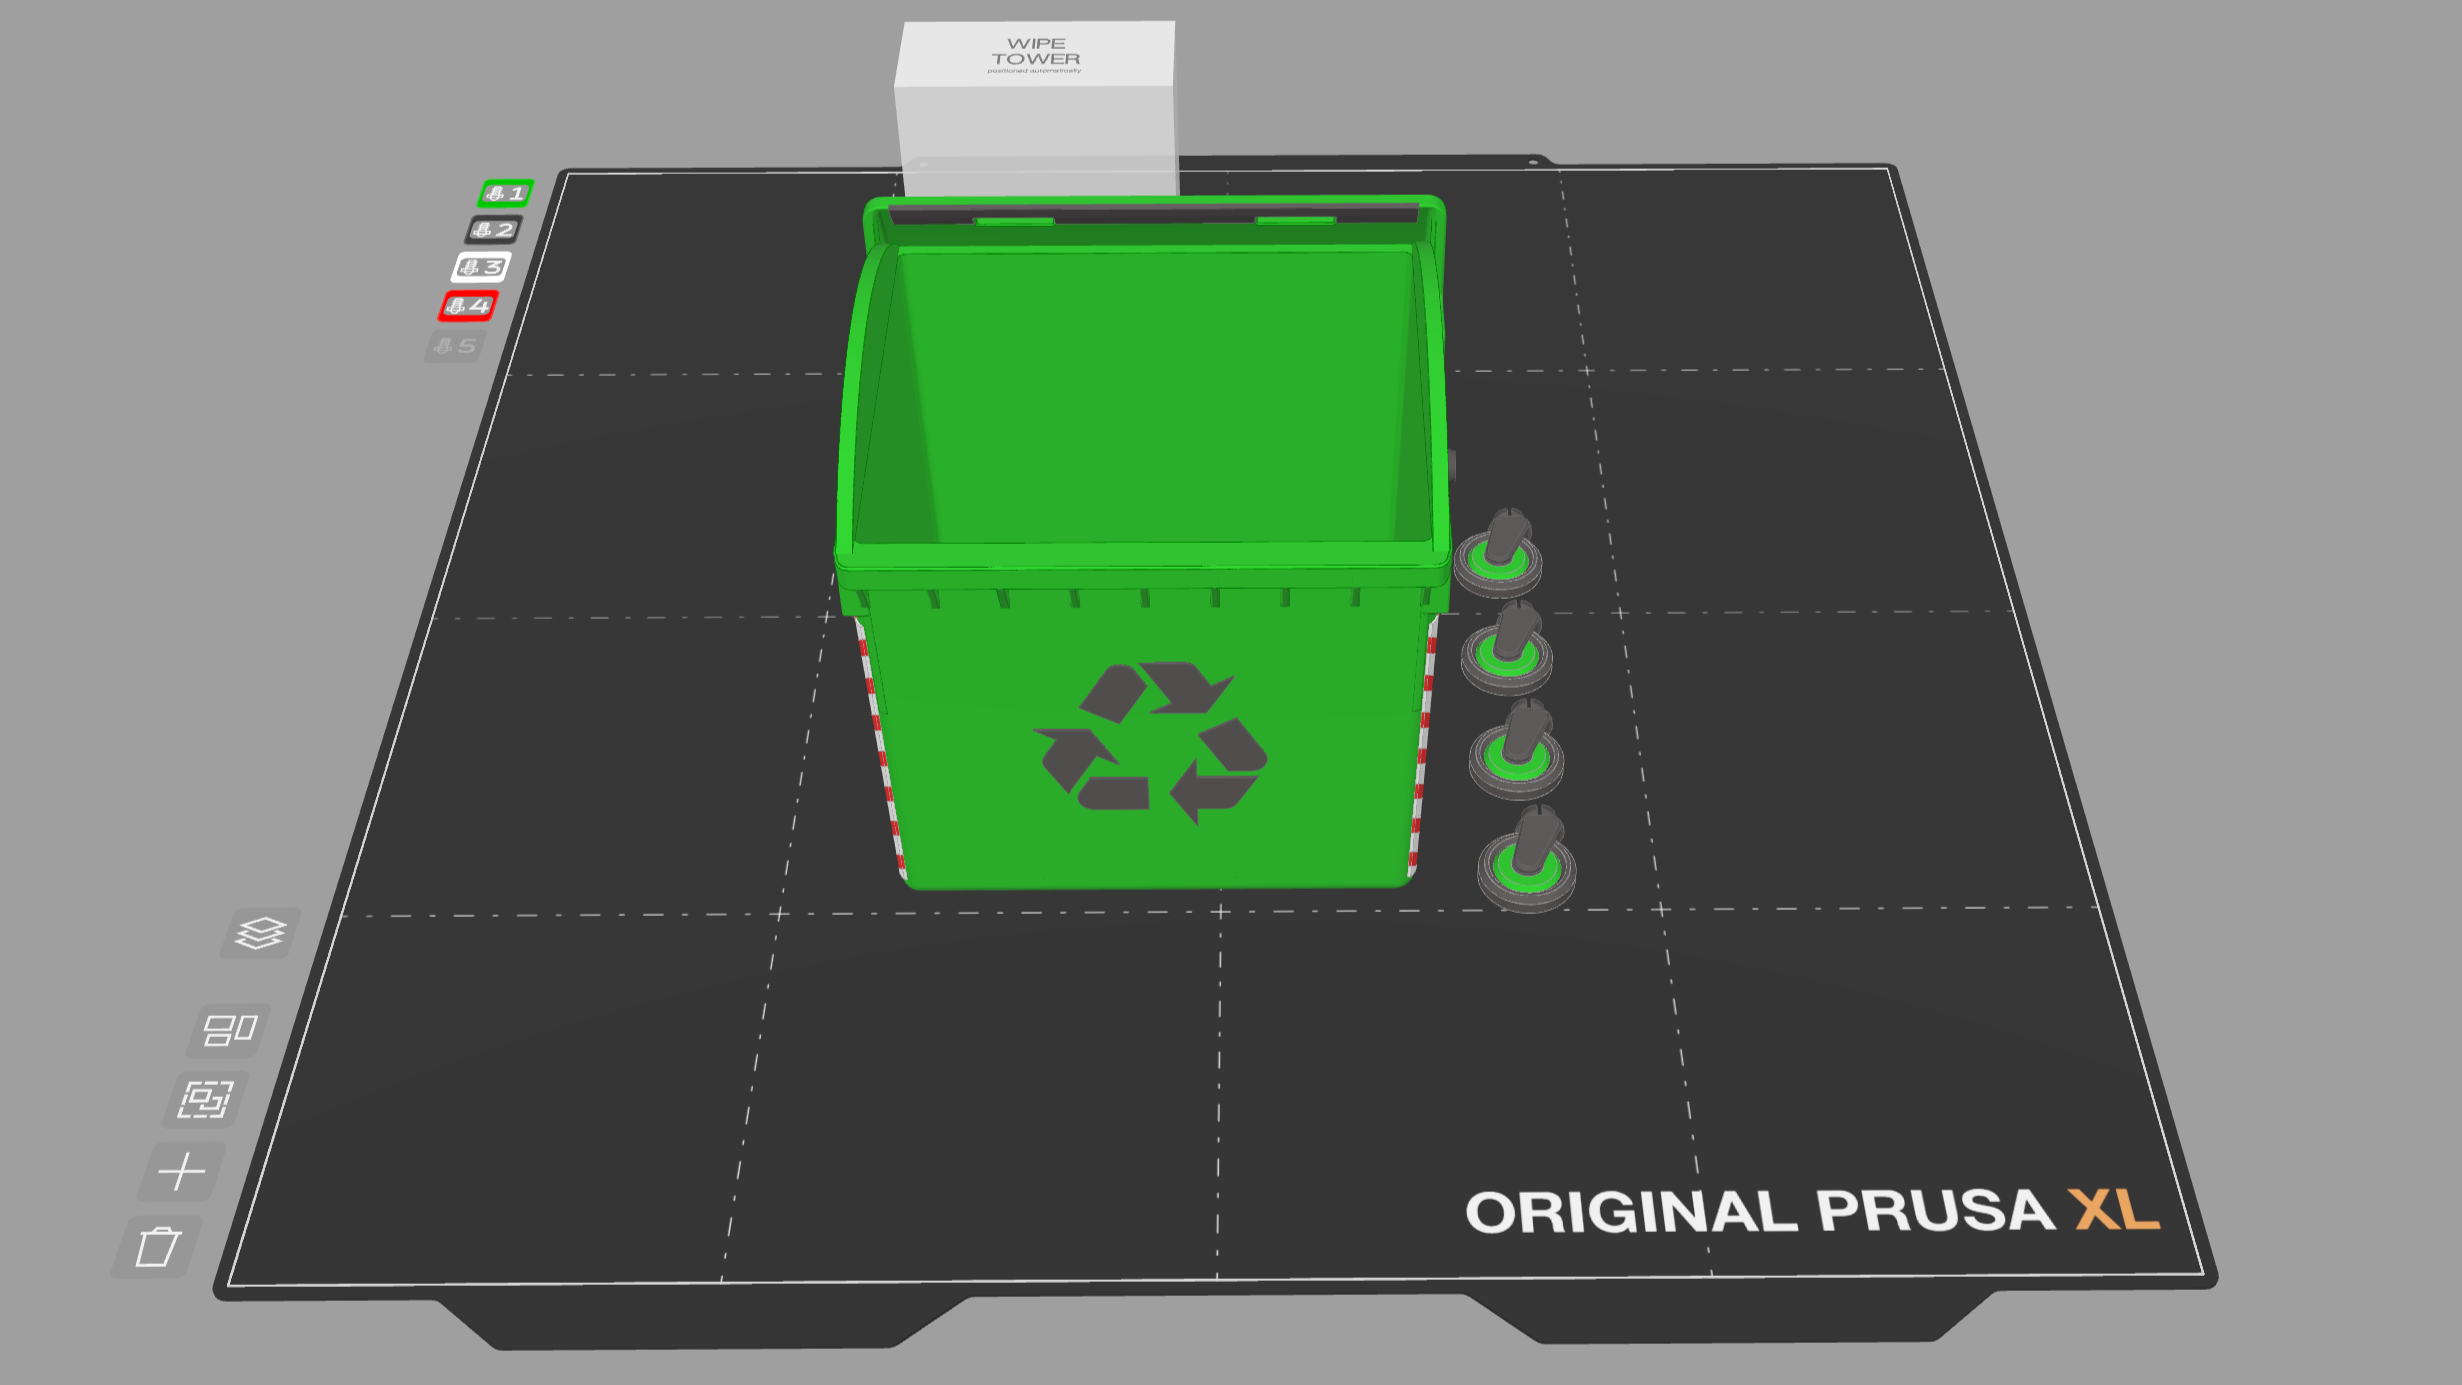
EasyPrint también puede generar archivos de impresión multicolor para impresoras con capacidad para múltiples materiales (por ejemplo, la Original Prusa XL o la Original Prusa MK4S con la actualización MMU3)..
Selecciona la herramienta de Pintar y añade otro material (color). Si haces clic en el objeto, la herramienta de relleno inteligente pintará todas las áreas circundantes hasta llegar a un ángulo agudo. Si haces clic en el área pintada por segunda vez, el ángulo de umbral se reducirá ligeramente, ampliando aún más el relleno actual.
Si haces clic en cualquier color con la herramienta Reemplazar, todas las instancias de ese color en el objeto se sustituirán por el color actualmente activo.
También puedes importar archivos de proyecto 3MF multicolor con varias piezas (mallas), como el Benchbin. Se mantendrán los colores asignados por el autor.
Puedes hacer doble clic en una parte de un objeto compuesto para asignarle un color mediante el botón Cambiar material/color.
Usa Pintar → Objeto para asignar rápidamente un color a varios objetos.
En la pestaña Materiales puedes cambiar un color que ya se haya aplicado a varios objetos.
Impresión en color con una impresora de un solo color
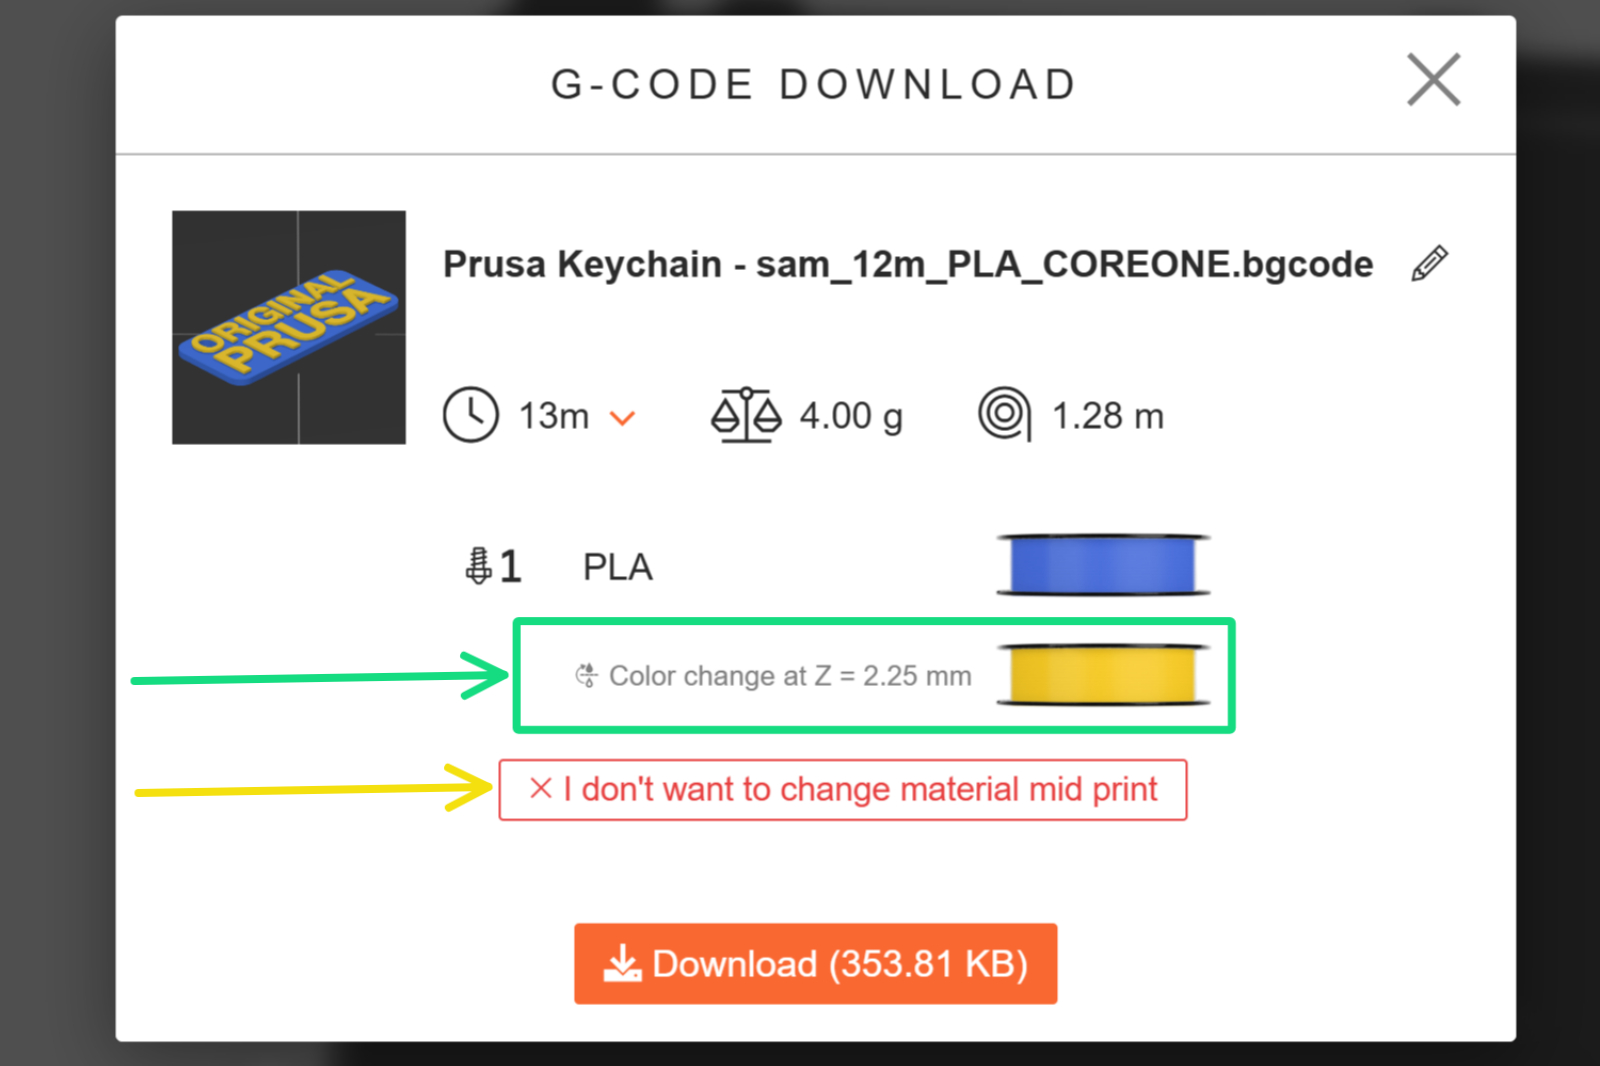
Puedes utilizar EasyPrint para imprimir en varios colores con impresoras de un solo color. La impresora se detendrá entre cada capa de impresión y te pedirá que cambies de filamento. Por eso, el cambio de color solo puede realizarse a lo largo de un plano perfectamente horizontal (paralelo a la plataforma de impresión). Esta técnica resulta útil para imprimir logotipos, carteles, etc.
Para aplicar el cambio de color, ve a Pintar → Dividir y selecciona un objeto. Arrastra el plano horizontal para seleccionar la zona en la que se aplicará el cambio de color. A continuación, selecciona un color y pulsa Aplicar. El color se aplicará por encima del plano horizontal.
Al exportar el archivo G-code, la pantalla de confirmación mostrará la altura de capa en la que se producirá el cambio de color. Asegúrate de estar junto a la impresora durante la impresión para realizar este cambio de color. Si no deseas realizar el cambio de color, puedes cancelarlo en esta pantalla de confirmación.
Asignación de materiales
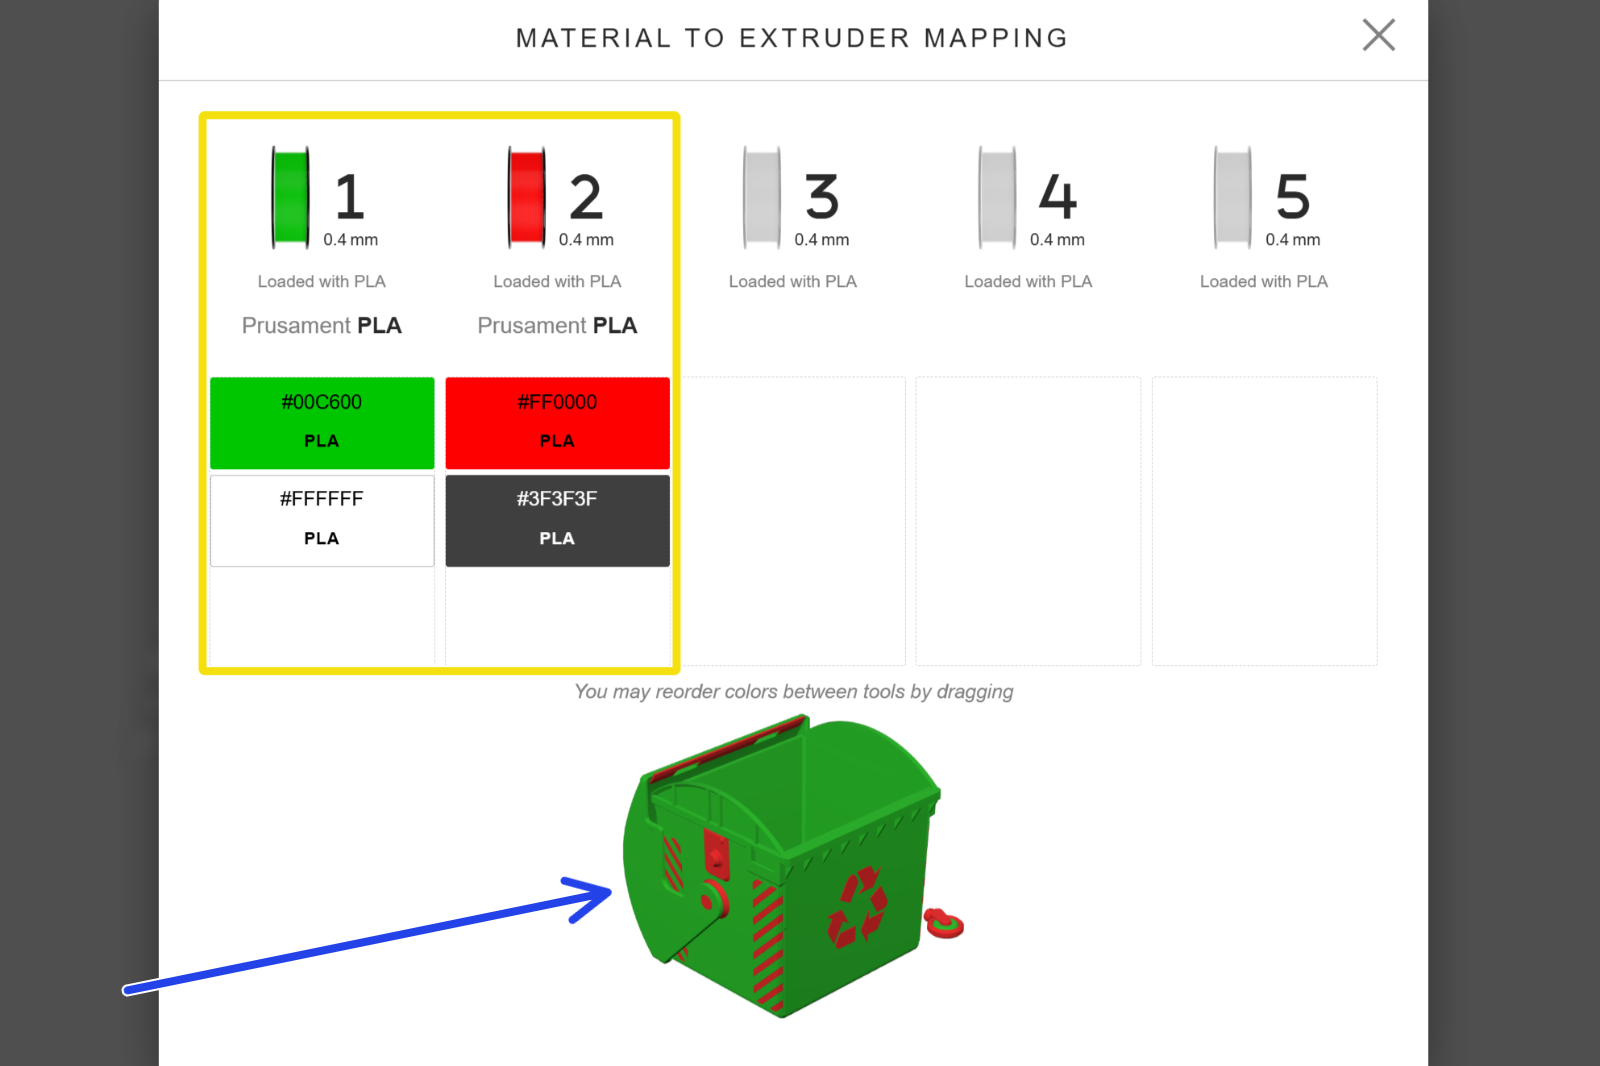
Puedes cambiar el material asignado a cada herramienta de una impresora multi-cabezal haciendo clic en cualquiera de los iconos de extrusor situados a la izquierda de la plataforma de impresión. En el menú emergente, arrastra y suelta los colores para asignarlos a la herramienta que desees.
Puedes asignar varios colores a un solo extrusor, y todos se fusionarán en uno solo (el color superior de la ranura). La impresora utilizará entonces la misma herramienta para imprimir todos esos colores. Esto puede resultar útil para reducir rápidamente el número de colores de un proyecto. El modelo que aparece en la parte inferior de la pantalla de asignación muestra una vista previa de los colores tras el laminado.
Pintado de Piel difusa
EasyPrint te permite aplicar de forma selectiva Piel Difusa a los objetos, lo que crea una superficie texturizada en el modelo impreso. Esto puede utilizarse para añadir una textura visual interesante a un modelo decorativo o para mejorar el agarre de los mangos en herramientas funcionales.
Activa las herramientas de pintura de Piel Difusa seleccionando Piel en la barra inferior. Selecciona Aplicar y toca la superficie del modelo para aplicar la piel difusa. Esto funciona como el Relleno Inteligente para la pintura de materiales: con un solo clic se aplicará la piel difusa a todas las áreas circundantes hasta que se alcance un ángulo pronunciado. Si haces clic en la piel difusa por segunda vez, el ángulo de umbral se reducirá ligeramente, ampliándola aún más. Eliminar funciona de la misma manera, pero elimina la piel difusa existente.
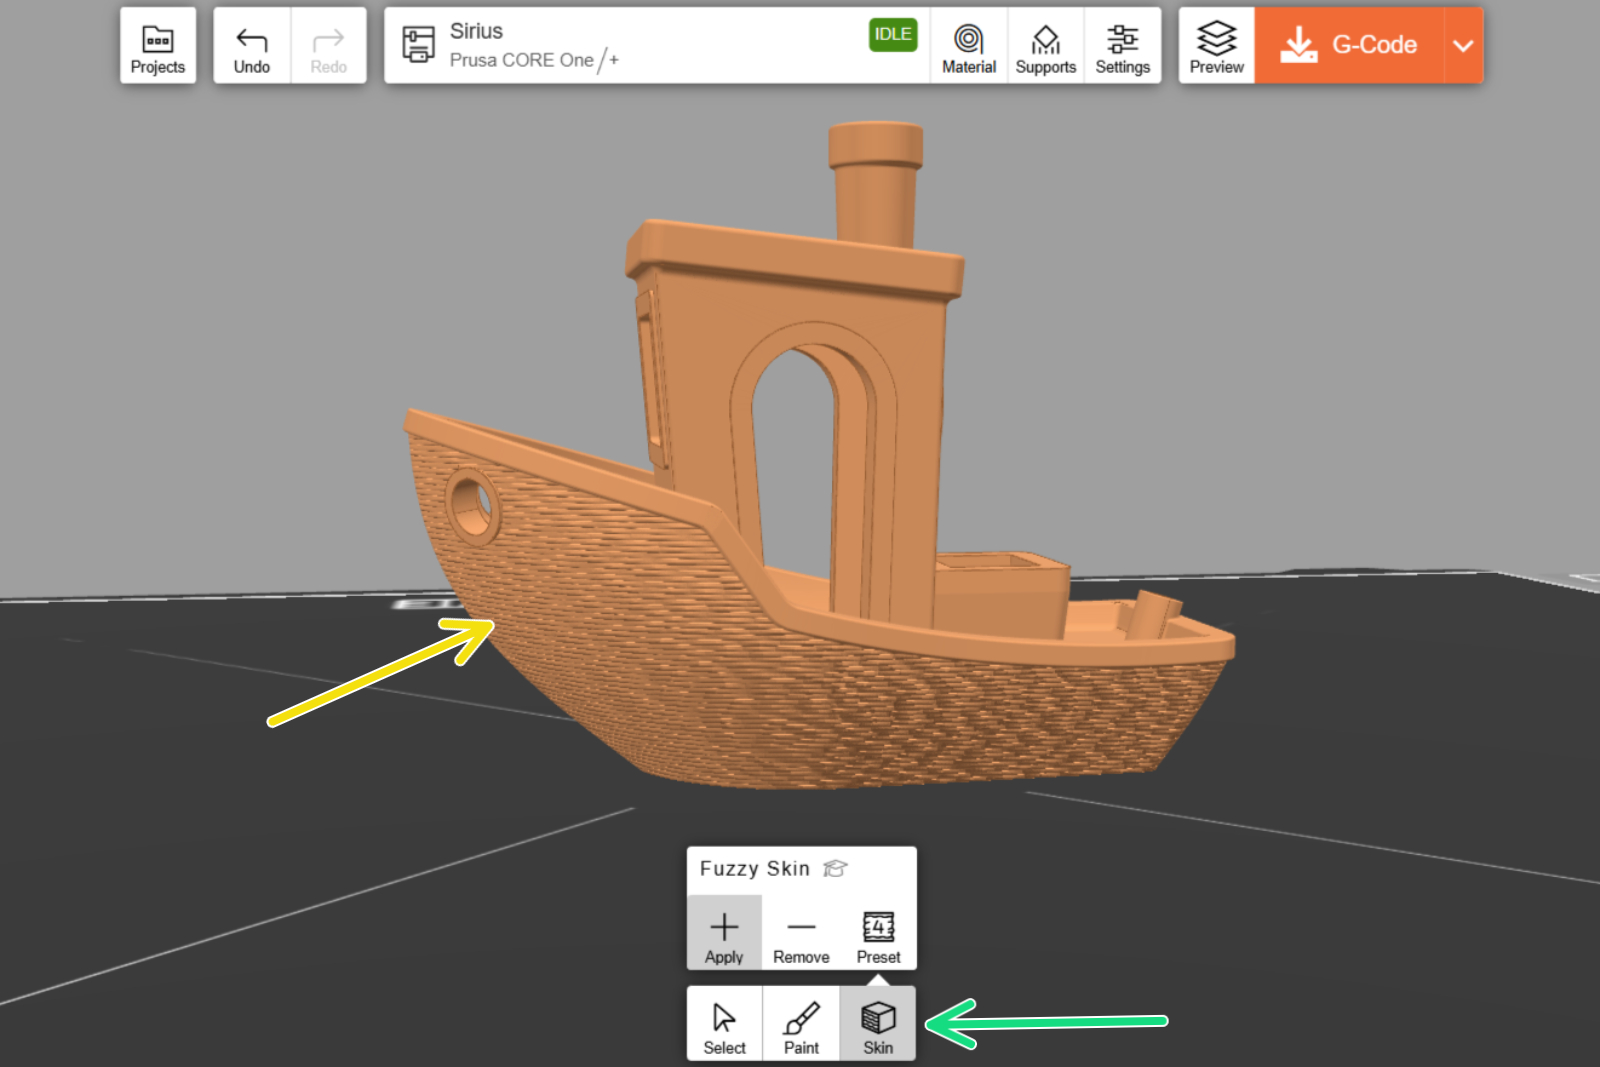
EasyPrint muestra una visualización de la textura en las superficies aplicadas (véase la flecha amarilla en la captura de pantalla), pero la textura real del objeto impreso se determina al seleccionar uno de los ajustes preestablecidos.
En la herramienta de Piel Difusa, puedes seleccionar uno de los 8 ajustes predefinidos. Cada ajuste incluye una foto de vista previa de una impresión real.

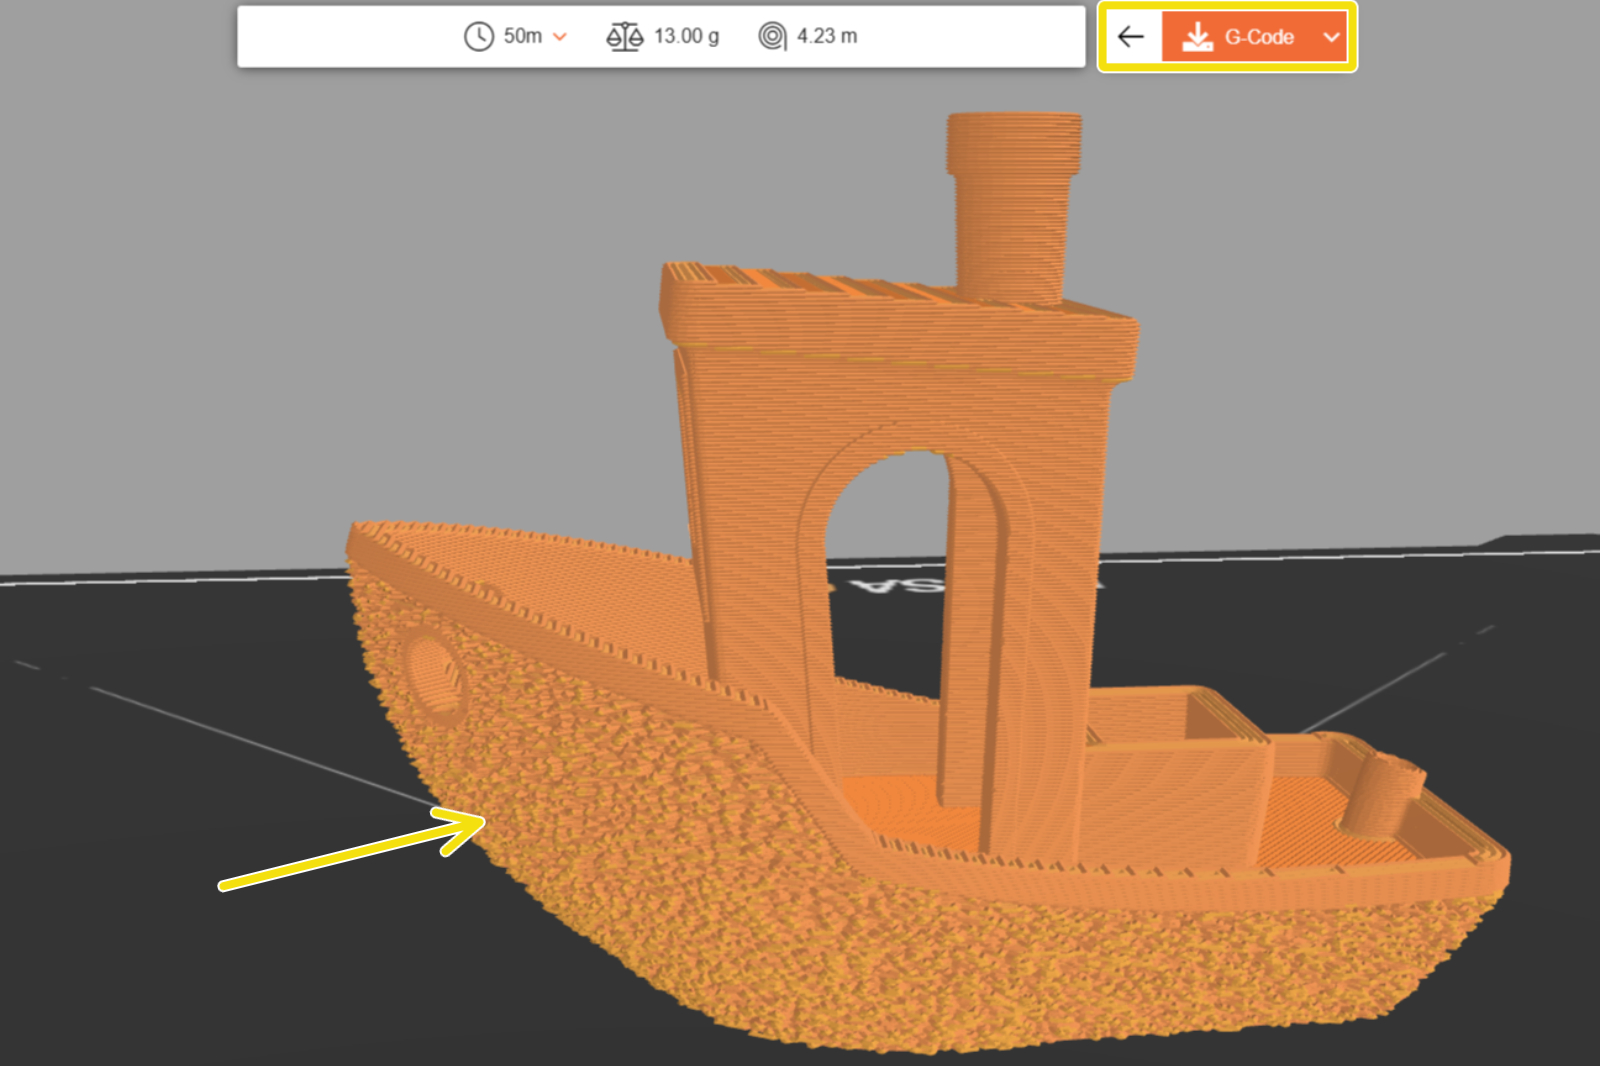
La vista previa del código G muestra una representación más precisa de la piel difusa resultante.
Ten en cuenta que la piel difusa solo funciona en paredes verticales; no tendrá ningún efecto en superficies planas. La piel difusa tampoco es adecuada para zonas que requieran precisión dimensional, ya que la textura distorsiona la superficie del modelo.