Español
Login
Impresoras 3D
Materiales
Piezas y accesorios
Software
Modelos 3D
Aplicaciones
Comunidad
Ayuda
Academy
Blog
Empresa
Soporte
Original Prusa MMU3
Ensamblaje Original Prusa MMU3
10C. MK3.5 Setup and Calibration | Herramientas necesarias para este capitulo
1. Herramientas necesarias para este capitulo
Step 1 of 26 (Chapter 14 of 15)
Modo pantalla completa
Contenidos
Comentarios
⬢
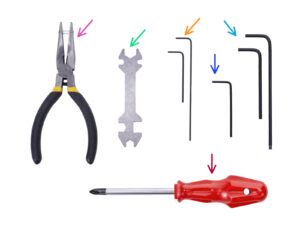
Por favor prepara las herramientas para este capítulo:
⬢
Unikey for tightening up the Festo fittings.
⬢
1.5mm Allen key for Filament sensor calibration
⬢
Llave Allen de 2.5mm para tornillos M3
⬢
Phillips screwdriver for power cable terminals
Loading...
Siguiente
Contenidos
Ensamblaje Original Prusa MMU3
1. Introducción
2. Desmontaje MMU2S (UPG)
3. Desmontaje Buffer MMU2S (UPG)
4. Montaje del cuerpo del tensor
5. Montaje del selector
6. Montaje del cuerpo de polea
7. Montaje del Casete del buffer
8. Montaje Porta bobinas
9A. MK4/S, MK3.9/S Nextruder mod
9B. Mod extrusor MK3S+ / MK3.5 (KIT)
9C. Extrusor MK3S+ (UPG)
10A. Configuración y Calibración MK4/S, MK3.9/S
10B. Configuración y Calibración MK3S+
10C. MK3.5 Setup and Calibration [Traducción en desarrollo]
Herramientas necesarias para este capitulo
Attaching the MMU unit (part 1)
Attaching the MMU unit (part 2)
Guiding the cable
MK3.5 Cable installation
MK3.5 Cable management
Cerrando la caja de electrónica MK3.5
Software Download
PrusaSlicer setup for MMU3
Firmware files download
Selecting a Printer firmware file
MK3.5 Firmware flashing (part 1)
Encendido del MMU MK3.5
MMU3 Firmware flashing (part 1)
MMU3 Firmware flashing (part 2)
IR filament sensor calibration (Part 1)
IR filament sensor calibration (Part 2)
IR filament sensor calibration (Part 3)
SuperFINDA sensor calibration info
SuperFINDA calibration
Error code details (Part 1)
Detalles del código de error (Parte 2)
MMU-to-Extruder PTFE tube parts preparation
MMU-to-Extruder PTFE tube
Spoolholders setup
Connecting Buffer PTFE tubes
11. Primer comienzo
Comentarios
Inicia sesión
para publicar un comentario
Sin comentarios