日本語
Login
3Dプリンター
マテリアル
部品 & アクセサリー
ソフトウェア
3Dモデル
応用事例
コミュニティ
ヘルプ
アカデミー
ブログ
会社概要
サポート
Original Prusa SL1
Original Prusa SL1キット組立て (v1.02)
4. Electronics & Lid | Tools and bags for this chapter
1. Tools and bags for this chapter
Step 1 of 48 (Chapter 4 of 6)
フルスクリーンモード
内容
コメント
⬢
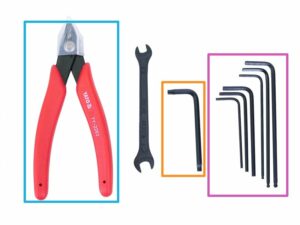
この章で、準備するもの:
⬢
2.0 mm 六角レンチ
⬢
2.5 mm Allen key
⬢
3.0 mm Allen key
⬢
4.0 mm Allen key
⬢
TX20 Torx key
⬢
Cutting pliers
必要な部品リストは、次のステップにも続きます。
Loading...
次
内容
Original Prusa SL1キット組立て (v1.02)
1. はじめに
2. Base & Tower
3. Covers & Platform
4. Electronics & Lid
Tools and bags for this chapter
Tools and bags for this chapter
パッケージからパーツを取り出し準備します
ケーブルおまとめツールの準備
Cable management
Cable management
UV LEDパーツの準備
Removing the cover
Mounting the UV LED assembly
タッチスクリーンパーツの準備
Mounting the touchscreen assembly
電装品の準備
Glueing the thermal pad
Inserting the electronics holder
Connecting both boards
Connecting Wi-Fi & Speaker
Mounting the electronics
ケーブルおまとめツールの準備
Connecting the electronics
Connecting the electronics
Connecting the electronics
Removing the protective film
プリント表示パーツの準備
Inserting the print display in the printer
Fixing the display in place
ディスプレイケーブル固定パーツの準備
Connecting the print display
Connecting the touchscreen (new version)
Connecting the touchscreen (old version)
Final check
ケーブルおまとめツールの準備
Final cable management
カバーパーツの準備
Connecting the power button and USB
カバーの取り付け
Preparing resin tank parts
レジンタンクフレームの準備
FEPフィルムの準備
レジンタンクフレームの準備
Inserting the torx screws
レジンタンクの取り付け
レジンタンクの取り付け
Installing the resin tank
Preparing acrylic lid parts
Mounting the acrylic lid
Returning the print platform
Haribo休憩タイムです!
Final check
5. Preflight check
Manual changelog SL1
コメント
ログイン
してコメントを投稿する
コメントなし