日本語
Login
3Dプリンター
マテリアル
部品 & アクセサリー
ソフトウェア
3Dモデル
応用事例
コミュニティ
ヘルプ
アカデミー
ブログ
会社概要
サポート
Original Prusa MMU3
Original Prusa MMU3 キット組立て
10A. MK4/S, MK3.9/S Setup and Calibration | Attaching the MMU unit (part 1)
1. Attaching the MMU unit (part 1)
Step 1 of 25 (Chapter 12 of 15)
フルスクリーンモード
内容
コメント
⬢
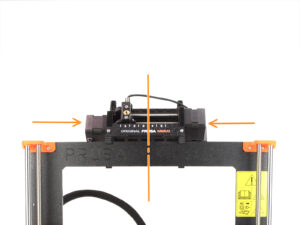
The MMU3 unit should be placed onto the top part of the printer's frame.
⬢
Place the MMU3 unit onto the frame.
Attach it just by the top hooks.
⬢
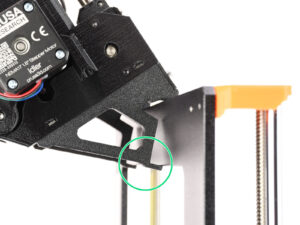
Look from behind, there are "clamps", which will be used to lock the unit to the frame in the next step.
Loading...
次
内容
Original Prusa MMU3 キット組立て
1. はじめに
2. MMU2Sの分解 (アップグレードキット)
3. MMU2S Buffer Disassembly (UPG)
4.アイドラーボディの組み立て
5.セレクターの組み立て
6. Pulley Body Assembly
7. Cassette Buffer Assembly
8. Spool holder Assembly
9A. MK4/S, MK3.9/S Nextruder mod
9B. MK3S+ / MK3.5 Extruder mod (KIT)
9C. MK3S+ Extruder (UPG)
10A. MK4/S, MK3.9/S Setup and Calibration [進行中の翻訳]
Attaching the MMU unit (part 1)
Attaching the MMU unit (part 2)
xBuddy preparation
Guiding the cable
Closing the electronics box
Software Download
PrusaSlicer setup for MMU3
Firmware files download
Firmware Upgrade: Printer
Turning the MMU on
MMU3 Firmware flashing (part 1)
MMU3 Firmware flashing (part 2)
Gears calibration
Gearbox Alignment
MMU Filament sensor calibration
Footer adjustment
SuperFINDA sensor calibration info
SuperFINDA calibration
Error code details (Part 1)
Error code details (Part 2)
Fittings INFO
MMU-to-Extruder PTFE tube parts preparation
MMU-to-Extruder PTFE tube
Spoolholders setup
Spoolholder-to-Buffer PTFE tube
10B. MK3S+ Setup and Calibration
10C. MK3.5 Setup and Calibration
11. ファーストフライト
コメント
ログイン
してコメントを投稿する
コメントなし