日本語
Login
3Dプリンター
マテリアル
部品 & アクセサリー
ソフトウェア
3Dモデル
応用事例
コミュニティ
ヘルプ
アカデミー
ブログ
会社概要
サポート
Original Prusa MMU2S
Original Prusa i3 MK3S to MMU2S [進行中の翻訳]
4. Idler body assembly | Tools necessary for this chapter
1. Tools necessary for this chapter
Step 1 of 15 (Chapter 8 of 14)
フルスクリーンモード
内容
コメント
⬢
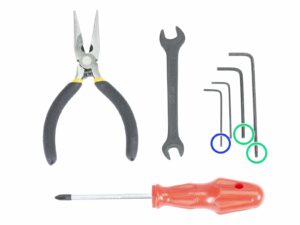
この章で準備するもの:
⬢
M3ネジ用の2.5mm六角レンチ
⬢
ナットの調整用の 1.5mm 六角レンチ
Note there are two types of the 2.5mm Allen keys. Use the longer one for screws, which are difficult to reach as this Allen key has a ball end.
You can use your own tools if you find them more suitable for the build.
Loading...
次
内容
Original Prusa i3 MK3S to MMU2S [進行中の翻訳]
1. はじめに
2A. MK3S+ extruder disassembly
2B. MK3S/MK2.5S - extruder disassembly
2A. MK3/MK2.5 - extruder disassembly
3A. MK3S+ extruder upgrade
3B. MK3S/MK2.5S - extruder upgrade
3A. MK3/MK2.5 - extruder upgrade
4. Idler body assembly
Tools necessary for this chapter
アイドラーパーツの準備
アイドラーベアリングの組み立て(パート1)
アイドラーベアリングの組み立て(パート2)
Idler nuts assembly
Idler centre bearing assembly
Final check
アイドラーボディーパーツの準備
Inserting M3nS nuts into idler-body
Inserting the idler in the idler-body
アイドラーモーターの組み立て(パート1)
アイドラーモーターの組み立て(パート2)
アイドラーモーターの組み立て(パート3)
It's Haribo time!
Final check
5. Pulley body assembly
6. Electronics and MMU2S unit assembly
7. Spool holder and buffer assembly
8. Preflight check & Calibration
9. First flight
Manual changelog MMU2S
コメント
ログイン
してコメントを投稿する
コメントなし