日本語
Login
3Dプリンター
マテリアル
部品 & アクセサリー
ソフトウェア
3Dモデル
応用事例
コミュニティ
ヘルプ
アカデミー
ブログ
会社概要
サポート
Original Prusa MMU2S
Original Prusa i3 MK3S to MMU2S [進行中の翻訳]
6. Electronics and MMU2S unit assembly | Tools necessary for this chapter
1. Tools necessary for this chapter
Step 1 of 32 (Chapter 10 of 14)
フルスクリーンモード
内容
コメント
⬢
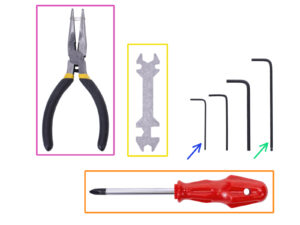
この章で準備するもの:
⬢
M3 ネジ 用の 2.5mm 六角レンチ
⬢
ナットの調整用の 2mm 六角レンチ
⬢
Needle-nose pliers for zip tie trimming
⬢
Philips screw-driver for power cable assembly
⬢
8mm wrench to tighten the QSM fittings
Older units may include a side wrench 8 mm.
Loading...
次
内容
Original Prusa i3 MK3S to MMU2S [進行中の翻訳]
1. はじめに
2A. MK3S+ extruder disassembly
2B. MK3S/MK2.5S - extruder disassembly
2A. MK3/MK2.5 - extruder disassembly
3A. MK3S+ extruder upgrade
3B. MK3S/MK2.5S - extruder upgrade
3A. MK3/MK2.5 - extruder upgrade
4. Idler body assembly
5. Pulley body assembly
6. Electronics and MMU2S unit assembly
Tools necessary for this chapter
電装パーツの準備
Electronics assembly
ケーブルの準備
Connecting the cables
ケーブルおまとめツールの準備
ケーブルの整理 (パート 1)
ケーブルの整理 (パート 2)
ケーブルの整理 (パート 3)
ケーブルの整理 (パート 4)
PTFEチューブの準備
PTFEチューブの組み付け(パート1)
PTFEチューブの組み付け(パート2)
PTFEチューブの組み付け(パート3)
フレームホルダーの準備
Frame holder assembly
MMU2S unit is finished!
PTFEチューブの準備
PTFEチューブの組み付け
MMU2Sユニットの組立て(パート1)
MMU2Sユニットの組立て(パート2)
MMU2Sユニットの組立て(パート3)
エクストルーダーとMMU2Sユニットの接続
Connecting the electronics
Connecting the electronics
エクストルーダーの接続 MK3S/+ (オプション)
Connecting the electronics MK3S/+
Connecting the electronics MK2.5S
Connecting the electronics MK2.5S (optional)
Connecting the electronics
ここで、Haribo休憩タイムです!
Final check!
7. Spool holder and buffer assembly
8. Preflight check & Calibration
9. First flight
Manual changelog MMU2S
コメント
ログイン
してコメントを投稿する
コメントなし