- English
- Italiano
- Deutsch
- Polski
- Français
- 日本語
- Home
- Řešení potíží
- Řešení potíží s tiskárnou
- Tool offset out of bounds #17104 (XL)
Tool offset out of bounds #17104 (XL)
- Řešení potíží při tisku
- Chybové QR kódy
- Řešení potíží s tiskárnou
- A64 Přehřátí #10207 (SL1/SL1S)
- Kontrola okolní teploty (MK3/MK3S)
- Pokojová teplota příliš nízká #10703 (SL1/SL1S)
- Příliš vysoká pokojová teplota #10702 (SL1/SL1S)
- Nastala neočekávaná chyba #10701 (SL1)
- Nelze spustit tuto akci #10506 (SL1/SL1S)
- BBF Allocation Failed #17531 (XL)
- Alokace BBF selhala #13531 (MK4) #21531 (MK3.9) #23531 (MK3.5)
- Alokace BBF selhala #17532 (XL)
- Inicializace BBF selhala #13532 (MK4) #21532 (MK3.9) #23532 (MK3.5)
- Bed maxtemp error #13205 (MK4) #21205 (MK3.9) #23205 (MK3.5)
- Bed mintemp error #13207 (MK4) #21207 (MK3.9) #23207 (MK3.5)
- Chyba předehřevu #13201 (MK4) #21201 (MK3.9) #23201 (MK3.5)
- Bed thermal runaway #13203 (MK4) #21203 (MK3.9) #23203 (MK3.5)
- Spálená pojistka (MINI)
- Prasklá pojistka (MK2S/MK2.5/MK2.5S)
- Spálená pojistka (MK3/MK3S/MK3S+)
- Spálená pojistka (MK4/S, MK3.9/S)
- Modrá obrazovka smrti (BSOD)
- Problém s deskou Boost #10320 (SL1S)
- Zaseknutá tiskárna (SL1/SL1S)
- Kalibrační projekt je neplatný #10543 (SL1/SL1S)
- Nelze zkopírovat projekt #10704 (SL1/SL1S)
- Nelze získat aktualizační kanál #10514 (SL1)
- Nelze načíst projekt #10539 (SL1/SL1S)
- Nelze odebrat projekt #10545 (SL1/SL1S)
- Ucpaná tryska/hotend (MK4)
- Ucpaná tryska/hotend (XL)
- Ucpaná tryska/hotend (MINI/MINI+)
- Ucpaná tryska/hotend (MK3.5/S, MK3S+, MK2.5S)
- Registrace Connectu selhala
- Registrace Connectu selhala #12401 (MINI)
- Registrace do Connectu selhala #17401 (XL)
- Registrace do Connectu selhala #21401 (MK3.9)
- Registrace do Connectu selhala #23401 (MK3.5)
- Registrace Connectu selhala #26401 (MK4S) #13401 (MK4)
- Adresář není prázdný #10546 (SL1/SL1S)
- Odpojený UV LED panel #10321 (SL1/SL1S)
- Test displeje selhal #10120 (SL1/SL1S)
- Dwarf error #17502 (XL)
- Dwarf error #17503 (XL)
- EEPROM I2C Receive Busy #17316 (XL)
- EEPROM I2C Receive Busy #26316 (MK4S) #13316 (MK4) #21316 (MK3.9) #23316 (MK3.5)
- Nouzové zastavení #12510 (MINI)
- Emergency stop #17510 (XL)
- Nouzové zastavení #13510 (MK4) #21510 (MK3.9) #23510 (MK3.5)
- ESP error #17504 (XL)
- Chyba ESP #17505 (XL)
- ESP error #17506 (XL)
- Chyba ESP #13504 (MK4) #21504 (MK3.9) #23504 (MK3.5)
- Chyba ESP #26505 (MK4S) #13505 (MK4) #21505 (MK3.9) #23505 (MK3.5)
- Chyba ESP #26506 (MK4S) #13506 (MK4) #21506 (MK3.9) #23506 (MK3.5)
- ESP není připojen #17533 (XL)
- Očekávané přehřátí #10714 (SL1/SL1S)
- Externí SPI flash W25X20CL/xFLASH neodpovídá - chyba
- Blob v extruderu
- EXTRUDER ERROR #17536 (XL)
- Extruder Maxtemp error #17206 (XL)
- Chyba extruderu Mintemp #17208 (XL)
- Zvuky z extruderu
- Extruder preheat error #17202 (XL)
- Teplota extruderu neodpovídá #17210 (XL)
- Extruder thermal runaway #17204 (XL)
- Extruze se zastavila uprostřed tisku (heat creep)
- Tovární nastavení (MINI)
- Obnova továrního nastavení (MK2S/MK2.5S/MK3S)
- Obnovení továrního nastavení (MK4/S, MK3.9/S, MK3.5/S, MINI/+, XL)
- Factory Reset (MMU)
- Tovární nastavení (MMU2S před firmwarem 1.0.6)
- Tovární nastavení (SL1/SL1S)
- Nelze načíst konfigurační soubor #10505 (SL1)
- Chyba kalibrace osy Z (MK3S/MK2.5S)
- Selhání ventilátoru #10106 (SL1/SL1S)
- Varování ventilátoru #10713 (SL1/SL1S)
- Vysunutí filamentu selhalo (MINI/MINI+)
- Filament nejde zavést
- Filament nejde zavést (MK4)
- Filament nejde zavést (XL)
- Senzor filamentu (MK4, MK3.9, XL)
- Soubor už existuje! #10520 (SL1)
- Soubor nenalezen #10518 (SL1/SL1S)
- Chyba souborového systému #12613 (MINI/MINI+)
- Chyba souborového systému #13613 (MK4) #21613 (MK3.9) #23613 (MK3.5)
- Nastavení FINDA a řešení problémů
- FINDA: Zaseknutý filament #04102 (MMU)
- Firmware v interní paměti flash je poškozen! #12608 (MINI)
- Firmware missing #17612 (XL)
- Nutná aktualizace firmwaru #26701 (MK4S) #13701 (MK4) #21701 (MK3.9) #23701 (MK3.5)
- Problémy s aktualizací firmwaru (MK2.5S/MK3S+/MMU2S/MMU3)
- Nedrží první vrstva (SL1/SL1S)
- Chyba při mazání flash paměti #12605 (MINI/MINI+)
- Flash erase error #17605 (XL)
- Chyba při mazání flash paměti #13605 (MK4) #21605 (MK3.9) #23605 (MK3.5)
- FW in internal flash corrupted #17608 (XL)
- FW v interní paměti poškozen #13608 (MK4) #21608 (MK3.9) #23608 (MK3.5)
- Hash verifikace selhala #12607 (MINI/MINI+)
- Hash verifikace selhala #17607 (XL)
- Hash verifikace selhala #13607 (MK4) #21607 (MK3.9)
- Vyhřívaná podložka se nezahřívá správně
- Nadproud portu podložky #13309 (MK4) #21309 (MK3.9) #23309 (MK3.5)
- Teplota vyhřívané podložky neodpovídá #17209 (XL)
- Chyba heatbreaku maxtemp #17212 (XL)
- Chyba Heatbreaku MAXTEMP #26212 (MK4S) #13212 (MK4) #21212 (MK3.9)
- Chyba Heatbreaku Mintemp #17211 (XL)
- Chyba Heatbreaku MINTEMP #26211 (MK4S) #13211 (MK4) #21211 (MK3.9)
- Chyba homingu #12301 (MINI)
- Homing error X #12304 (MINI/MINI+)
- Homing error X #17304 (XL)
- Chyba homingu X #26304 (MK4S) #13304 (MK4) #21304 (MK3.9) #23304 (MK3.5)
- Homing error Y #12305 (MINI/MINI+)
- Homing error Y #17305 (XL)
- Chyba homingu Y #26305 (MK4S) #13305 (MK4) #21305 (MK3.9) #23305 (MK3.5)
- Homing error Z #17301 (XL)
- Chyba homingu Z #23301 (MK3.5)
- Homing error Z #26301 (MK4S) #13301 (MK4) #21301 (MK3.9)
- Ventilátor hotendu se netočí
- Nadproud výhřevu hotendu #17322
- Chyba Hotendu maxtemp #23206 (MK3.5)
- Chyba Hotendu mintemp #23208 (MK3.5)
- Chyba Hotendu mintemp #13208 (MK4) #21208 (MK3.9)
- Hotend preheat error #23202 (MK3.5)
- Chyba předehřevu hotendu #13202 (MK4) #21202 (MK3.9)
- Teplota hotendu neodpovídá #13210 (MK3.9/MK4) #23210 (MK3.5)
- Teplota hotendu neodpovídá #23210 (MK3.5)
- Hotend thermal runaway #23204 (MK3.5)
- Hotend thermal runaway #13204 (MK4) #21204 (MK3.9)
- I2C Receive failed #17315 (XL)
- I2C Receive Failed #26315 (MK4S) #13315 (MK4) #21315 (MK3.9) #23315 (MK3.5)
- I2C Receive Timeout #17317 (XL)
- I2C Receive Timeout #26317 (MK4S) #13317 (MK4) #21317 (MK3.9) #23317 (MK3.5)
- I2C Přijetí nedefinováno #17318 (XL)
- I2C Receive undefined #26318 (MK4S) #13318 (MK4) #21318 (MK3.9) #23321 (MK3.5)
- I2C odeslání obsazeno #17312 (XL)
- I2C odeslání obsazeno #13312 (MK4) #21312 (MK3.9) #23312 (MK3.5)
- I2C odeslání selhalo #17311 (XL)
- I2C Send failed #13311 (MK4) #21311 (MK3.9) #23311 (MK3.5)
- I2C Odeslání - časový limit #17313 (XL)
- I2C odeslání - časový limit #13313 (MK4) #21313 (MK3.9) #23313 (MK3.5)
- I2C Send Undefined #17314 (XL)
- I2C Send Undefined #13314 (MK4) #21314 (MK3.9) #23314 (MK3.5)
- Podvod! Falešný podpis #17606 (XL)
- Nesprávný model tiskárny #10705 (SL1/SL1S)
- Interní paměť je plná #10516 (SL1/SL1S)
- Neplatný API klíč #10405 (SL1/SL1S)
- Neplatná velikost FW na USB #12603 (MINI/MINI+)
- Neplatná velikost FW na USB #13603 (MK4) #21603 (MK3.9) #23603 (MK3.5)
- Invalid FW size on USB flash drive #17603 (XL)
- Kalibrace IR senzoru filamentu (MMU3, MMU2S)
- Řešení problémů se senzorem filamentu (MINI/MINI+)
- Řešení problémů s IR senzorem filamentu (MK2.5S,MK3S)
- Nefunkční LCD obrazovka
- LED Memory Error #17529 (XL)
- Chyba paměti LED #26529 (MK4S) #13529 (MK4) #21529 (MK3.9) #23529 (MK3.5)
- Doladění osy Z se neukládá
- Zavedení do extruderu selhalo #04108 (MMU)
- Loadcell Bad Configuration #17527 (XL)
- Špatná konfigurace loadcell #26527 (MK4S) #13527 (MK4) #21527 (MK3.9)
- Měření loadcellu selhalo #17526 (XL)
- Měření Loadcellu selhalo #26526 (MK4S) #13526 (MK4) #21526 (MK3.9)
- Loadcell není zkalibrován #17523 (XL)
- Loadcell není zkalibrován #13523 (MK4) #21523 (MK3.9)
- Chyba tárování loadcellu #17524 (XL)
- Chyba tárování loadcellu #13524 (MK4) #21524 (MK3.9)
- Loadcell tárování selhalo #17525 (XL)
- Chyba tárování loadcellu #26525 (MK4S) #13525 (MK4) #21525 (MK3.9)
- Vypršel časový limit pro loadcell #17528 (XL)
- Loadcell Timeout #26528 (MK4S) #13528 (MK4) #21528 (MK3.9)
- Loadcell troubleshooting
- Záznam dat po sériové lince (MMU2S)
- Hlasité zvuky z tiskárny (SL1/SL1S)
- Testování senzorů M.I.N.D.A./SuperPINDA (MINI/MINI+)
- Časový limit požadavku na Marlin #17530 (XL)
- Časový limit požadavku na Marlin #26530 (MK4S) #13530 (MK4) #21530 (MK3.9) #23530 (MK3.5)
- Varování: maska není k dispozici #10709 (SL1/SL1S)
- Maxtemp error bed (přehřátí podložky) #12205 (MINI)
- Maxtemp error print head (přehřátí tiskové hlavy) #12206 (MINI)
- Chyba MCU Maxtemp #17213 (XL)
- Mintemp error bed (ochlazení podložky) #12207 (MINI)
- Mintemp error print head (ochlazení tiskové hlavy) #12208 (MINI)
- Špatně usazený senzor PINDA (MK2/S)
- Chybějící části (SL1/SL1S)
- MK3S neustále vyžaduje výměnu filamentu
- MMU MCU nedostatečné napájení #04307 (MMU)
- MMU Overcurrent #26310 (MK4S) #13310 (MK4) #21310 (MK3.9) #23310 (MK3.5)
- Idler MMU2S se nemůže volně pohybovat
- Co znamenají LED u MMU2S
- Selektor MMU2S se nepohybuje
- Modular bed error #17250 (XL)
- Modular bed error #17251 (XL)
- Modular bed error #17252 (XL)
- Modular bed error #17253 (XL)
- Chyba modulárního bedu #17254 (XL)
- Chyba modulárního bedu #17255 (XL)
- Chyba modulárního bedu #17256 (XL)
- Chyba modulárního bedu #17257 (XL)
- Modular bed error #17302 (XL)
- Modular bed error #17303 (XL)
- Chyba modulárního bedu #17319 (XL)
- Chyba modulárního bedu #17320 (XL)
- Modular bed error #17501 (XL)
- Použití multimetru
- Žádný soubor na USB #12604 (MINI/MINI+)
- Neexistuje soubor k opětovnému tisku #10508 (SL1)
- Žádný firmware na interní paměti flash #12612 (MINI/MINI+)
- Žádný firmware na interní paměti flash #13612 (MK4) #21612 (MK3.9)
- Na USB není firmware #13604 (MK4) #21604 (MK3.9) #23604 (MK3.5)
- No FW on USB flash drive #17604 (XL)
- Síť odpojena #10402 (SL1/SL1S)
- Nedostatek vrstev #10540 (SL1/SL1S)
- Nedostatek pryskyřice #10706 (SL1/SL1S)
- Čištění trysky selhalo (MK4, MK3.9)
- Čištění trysky selhalo (XL)
- Tryska narazila do vyhřívané podložky
- Nadproud výhřevu trysky #23308 (MK3.5)
- Nadproud výhřevu trysky #13308 (MK4) #21308 (MK3.9)
- Varování: objekt oříznut #10710 (SL1/SL1S)
- Otevírání projektu selhalo #10504 (SL1/SL1S)
- Nedostatek paměti #17507 (XL)
- Nedostatek paměti #13507 (MK4) #21507 (MK3.9) #23507 (MK3.5)
- Testování sondy P.I.N.D.A./SuperPINDA
- Parametry mimo rozsah #10707 (SL1/SL1S)
- Pin not reached #17107 (XL)
- Vyrovnávací paměť PNG je plná #17508 (XL)
- Vyrovnávací paměť PNG je plná #13508 (MK4) #21508 (MK3.9) #23508 (MK3.5)
- Chyba předehřevu #12201 (MINI)
- Chyba předehřevu tiskové hlavy #12202 (MINI)
- Preload selhal #10503 (SL1/SL1S)
- Chybí ukázkové soubory tisku #10523 (SL1/SL1S)
- Tiskový ventilátor se netočí
- Tiskárnu nejde zapnout nebo se sama vypíná
- Analýza projektu selhala #10542 (SL1/SL1S)
- Projekt je poškozen #10541 (SL1/SL1S)
- Řešení potíží s PrusaLinkem
- Puppy error #17511 (XL)
- Puppy error #17512 (XL)
- Puppy error #17513 (XL)
- Puppy error #17514 (XL)
- Puppy error #17515 (XL)
- Puppy error #17516 (XL)
- Puppy error #17517 (XL)
- Puppy error #17518 (XL)
- Puppy error #17519 (XL)
- Puppy error #17520 (XL)
- Puppy error #17521 (XL)
- Puppy error #17522 (XL)
- Chyba Remote API #10407 (SL1/SL1S)
- Nízká hladina resinu #10712 (SL1/SL1S)
- Měření resinu selhalo #10124 (SL1/SL1S)
- Chyba senzoru pryskyřice #10307 (SL1/SL1S)
- Příliš vysoká hladina resinu #10109 (SL1/SL1S)
- Příliš nízká hladina resinu #10108 (SL1/SL1S)
- Vzorové G-cody
- Ukládání logu (SL1/SL1S)
- Nefunkční SD karta
- SD karty a USB flash disky
- Selftest selhal (XL multi-tool)
- Selftest failed (XL)
- Verifikace podpisu selhala #12606 (MINI/MINI+)
- Verifikace podpisu selhala #13606 (MK4) #21606 (MK3.9) #23606 (MK3.5)
- Mechanismus naklápění SL1
- Špageti monster
- Srovnání pravého úhlu os MINI
- Status LED explained (MK4/XL)
- Vysvětlení významu stavových LED (MMU3)
- Detekce zaseklého filamentu #26101 (MK4S) #13101 (MK4) #21101 (MK3.9) #17108 (XL)
- Zamotaný filament
- Teplota vyhřívané podložky neodpovídá #12209 (MINI/MINI+)
- Teplota tiskové hlavy neodpovídá #12210 (MINI/MINI+)
- Teplota mimo rozsah #10208 (SL1/SL1S)
- Ztráta teploty podložky (thermal runaway) #12203 (MINI)
- Ztráta teploty tiskové hlavy (thermal runaway) #12204 (MINI)
- Zkrat TMC driveru #04304 (MMU)
- Zkrat TMC driveru #04314 (MMU)
- Zkrat TMC driveru #04324 (MMU)
- Tool offset out of bounds #17104 (XL)
- What happened?
- How to fix it?
- Toolchanger error #17101 (XL)
- Toolchanger problem (XL multi-tool)
- Kontrola věže selhala #10118 (SL1/SL1S)
- Neoprávněné #10406 (SL1/SL1S)
- Under-extrusion (Nextruder printers)
- Neočekávaná chyba #10501 (SL1/SL1S)
- Neočekávaná chyba MC #10306 (SL1/SL1S)
- Neznámý model tiskárny #10323 (SL1/SL1S)
- Nepodporovaná verze BBF #12614 (MINI/MINI+)
- Nepodporovaná verze BBF #13614 (MK4) #21614 (MK3.9) #23614 (MK3.5)
- Unsupported Buddy FW #17611 (XL)
- Unsupported firmware BBF file #17614 (XL)
- Unsupported printer model #17610 (XL)
- Nepodporovaný model tiskárny #12610 (MINI/MINI+)
- Nepodporovaný model tiskárny #13610 (MK4) #21610 (MK3.9) #23610 (MK3.5)
- Nepodporovaná verze tiskárny #12611 (MINI/MINI+)
- Nepodporovaná verze tiskárny #13611 (MK4) #21611 (MK3.9) #23611 (MK3.5)
- Na portu USB zjištěn nadproud #17307 (XL)
- Přepetí na USB zařízení #13307 (MK4) #21307 (MK3.9) #23307 (MK3.5)
- USB disk nenalezen #10528 (SL1/SL1S)
- USB flash drive not connected #17602 (XL)
- USB flash error #17613 (XL)
- USB disk nenalezen #12602 (MINI/MINI+)
- USB není připojeno #13602 (MK4) #21602 (MK3.9) #23602 (MK3.5)
- USB Port Overcurrent #17306 (XL)
- Nadproud na USB portu #13306 (MK4) #21306 (MK3.9) #23306 (MK3.5)
- Chyba teploty UV LED světla #10209 (SL1/SL1S)
- Chyba napětí UV LED #10309 (SL1)
- Vibrace během tisku (MK3S+/MK2.5S)
- Nesprávný model tiskárny #10544 (SL1/SL1S)
- Chybná revize pohybového ovladače #10301 (SL1)
- XY position invalid #17106 (XL)
- XY probe unstable #17105 (XL)
- Chybová hlášení při tisku
What happened?
On the multi-tool versions of the Original Prusa XL, the offset of the tools compared to the first is calibrated through the Tool Offset Calibration. If the offset of one of the tools deviates too far from the expected range, the printer will show the following message: "Tool %d offset %c: %.3f is out of bounds [%.3f, %.3f]".
Error name: Tool offset out of bounds
Error code: #17104
How to fix it?
Filament unload
Make sure that the filament is unloaded before the calibration process.
Nozzle position
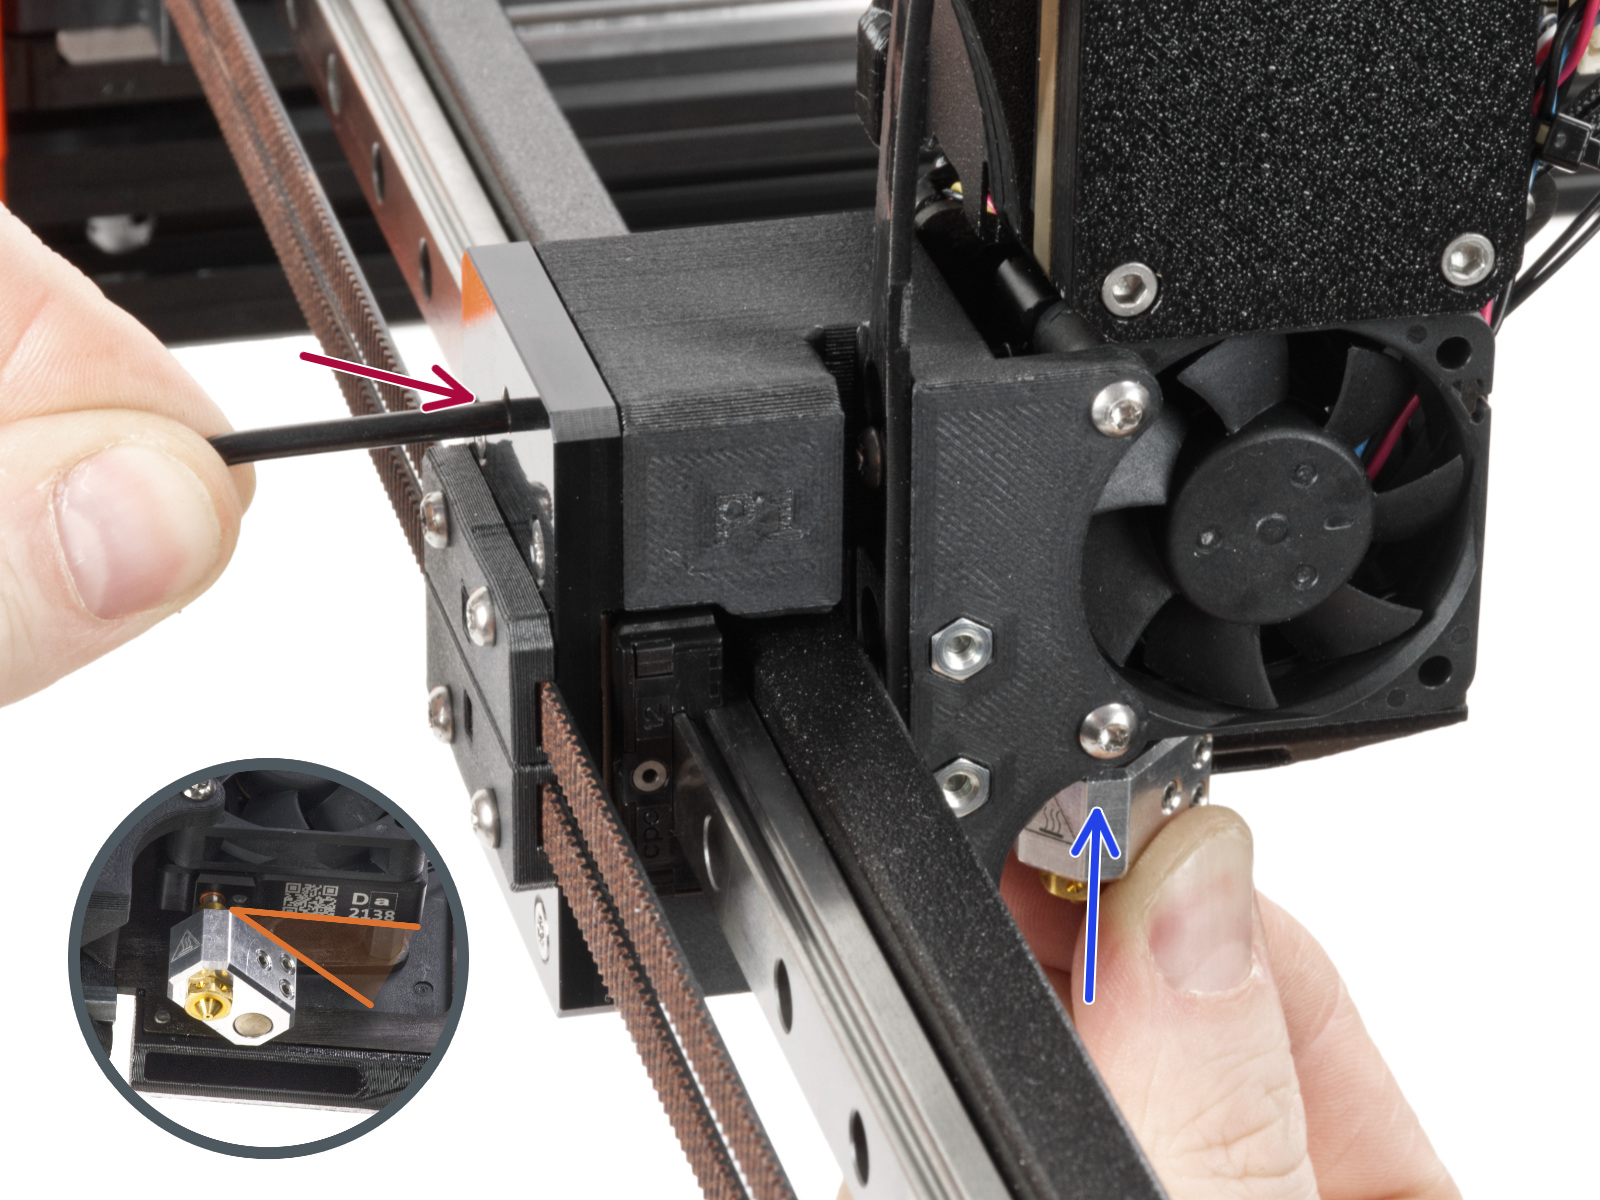
On single-tool XL, after removing the x-carriage cover, hold the heater block (make sure that the nozzle is not heated!), and use the Torx TX8 key as shown in the picture to tighten the set screw. Do not use extra force while tightening, it may damage the hotend tube. The nozzle must be approximately at a 35°-40° angle to avoid damaging the hotend cables.
 |  |
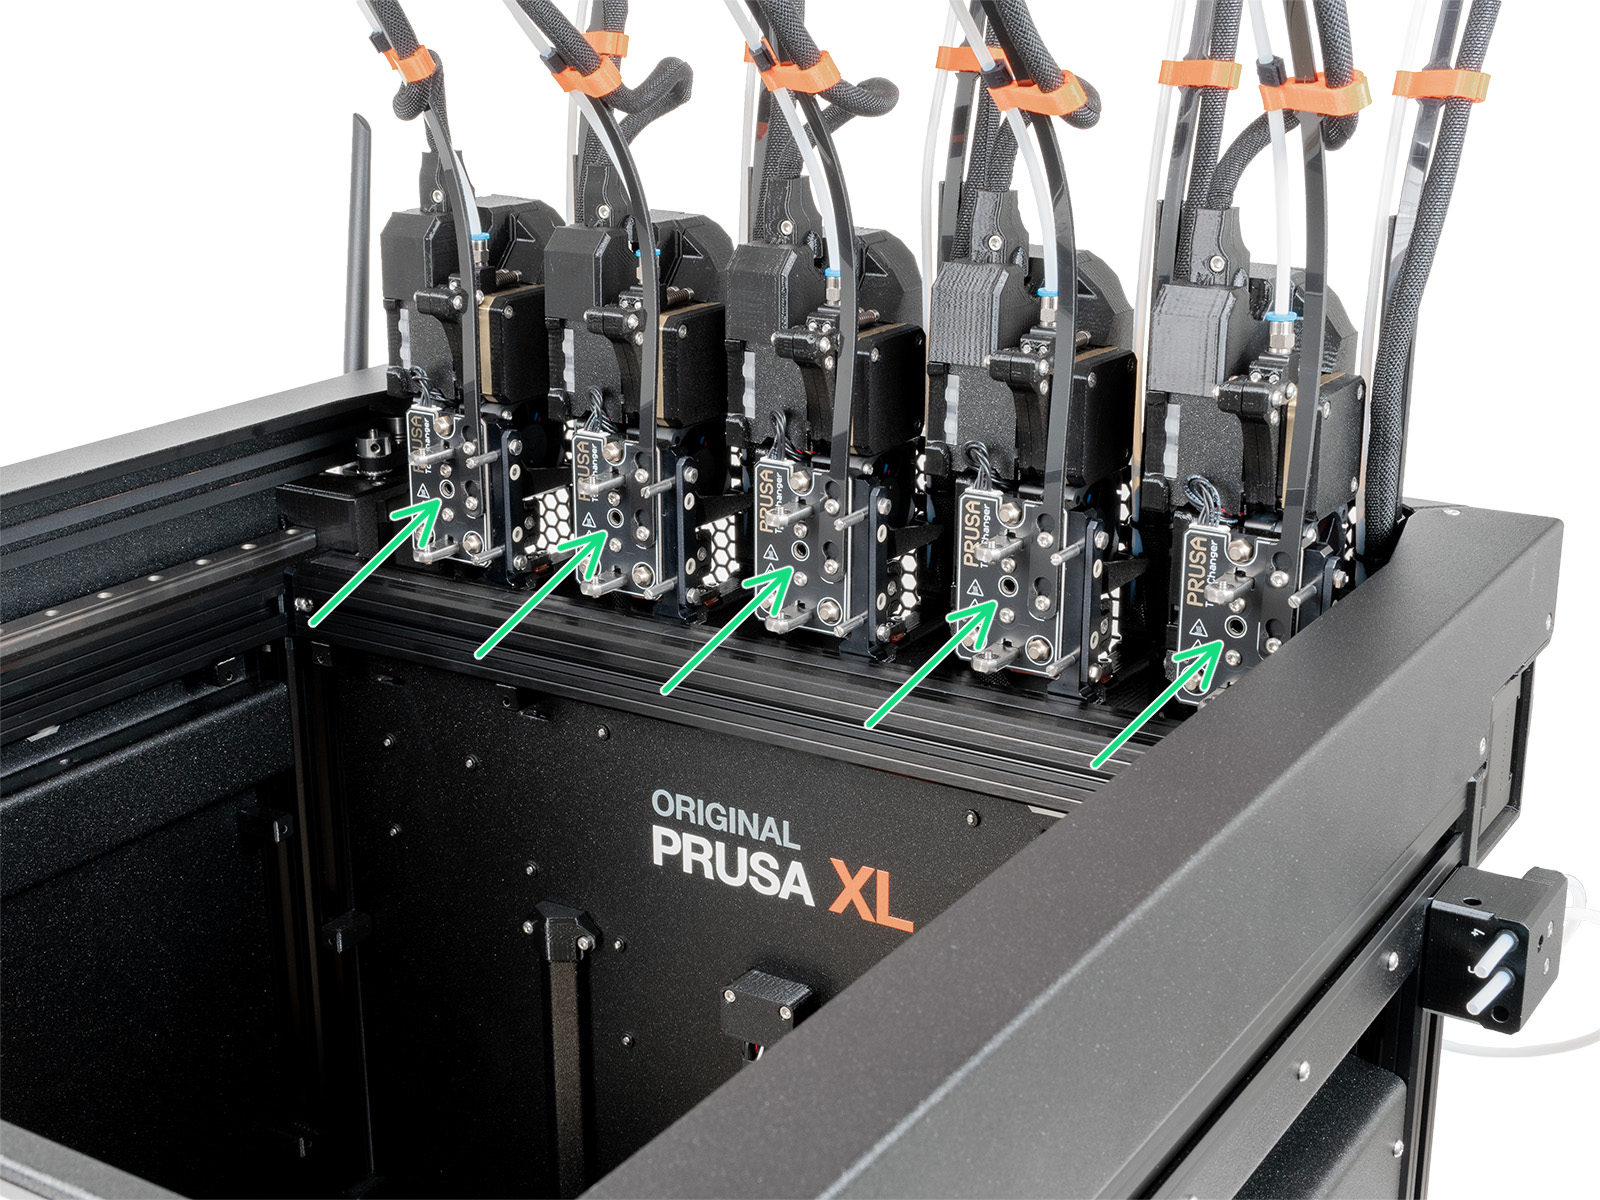
On multi-tool XL, identify the tool that has the nozzle to be checked, and park it. Hold the heater block (make sure that the nozzle is not heated!), and use the Torx TX8 key in the part shown in the picture to tighten the set screw. Do not use extra force while tightening, it may damage the hotend tube. The nozzle must be approximately at a 35°-40° angle to avoid damaging the hotend cables.

Nozzle cleaning
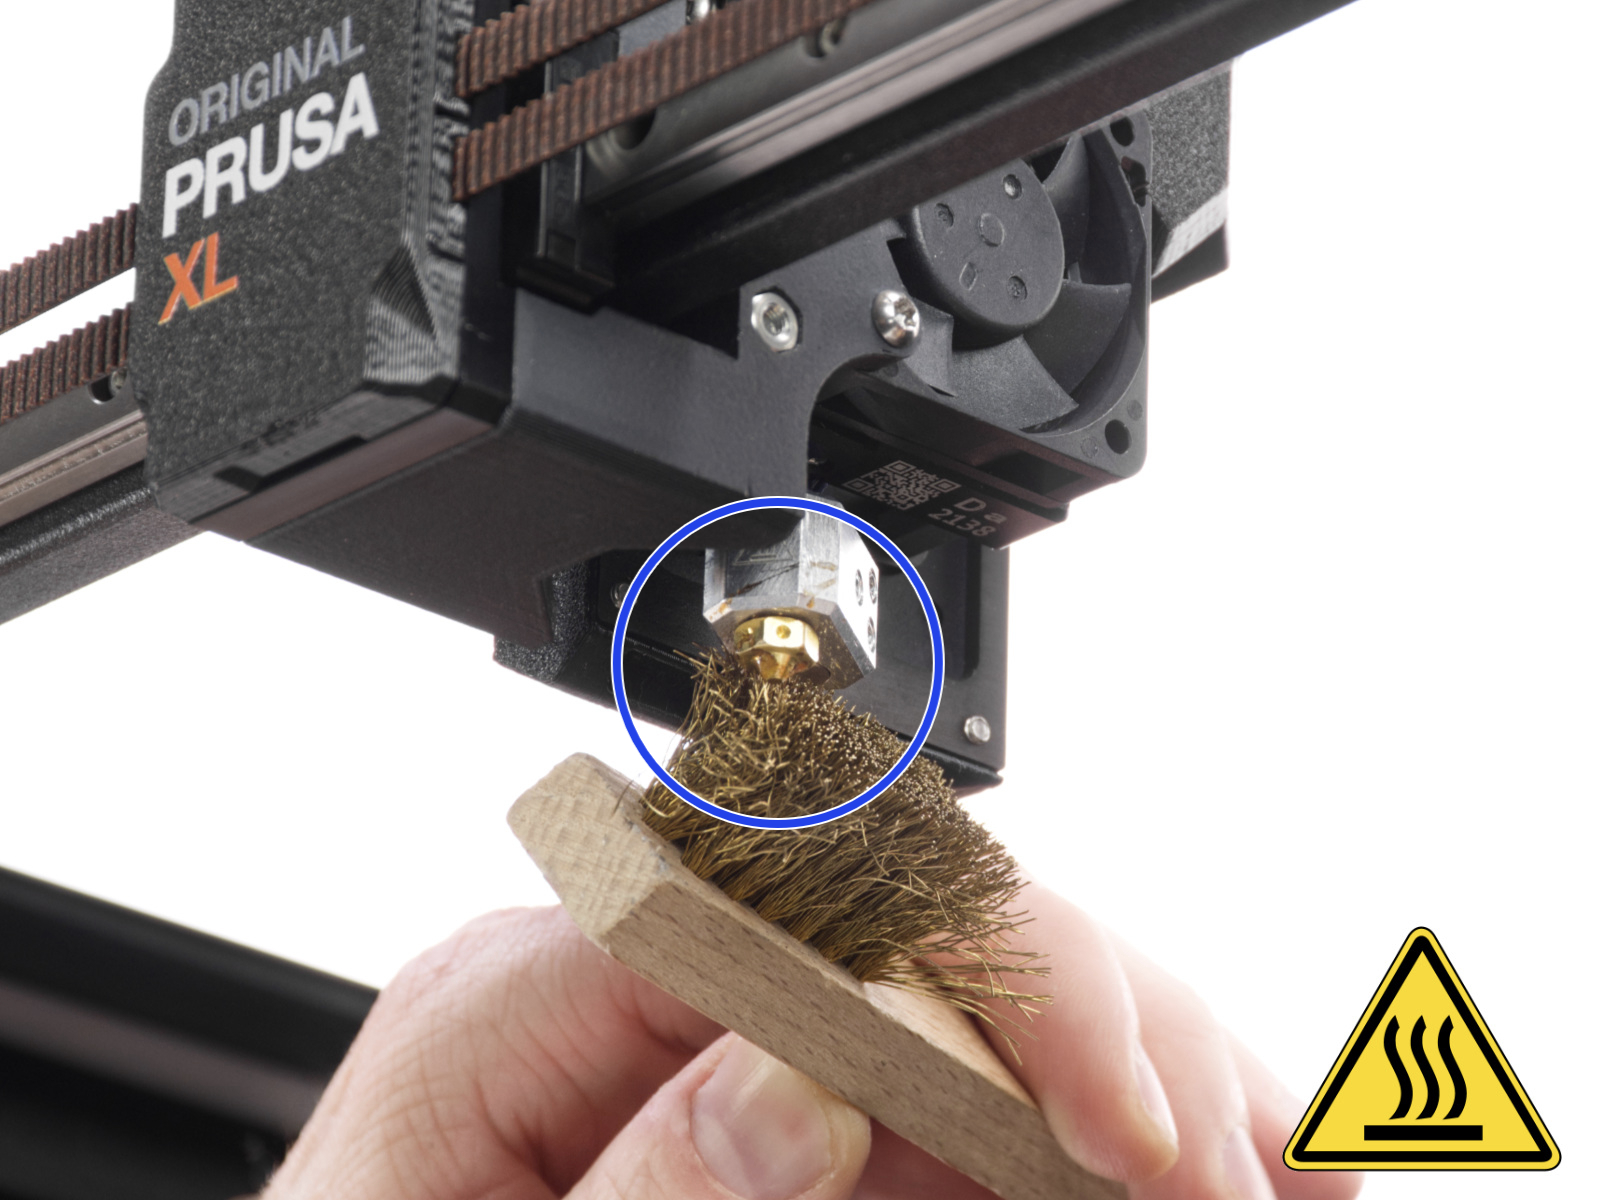
Use a small brass brush to clear away any old plastic stuck on the nozzle and heaterblock. Avoid contact of the brush with the hotend cables, as this could cause a short circuit.

Swap the hotend
If the points above did not solve the issue, swap the hotend of the failing tool with one of the hotends from a tool that passes the calibration.
If the error moves with the hotend, please contact our customer support with this information.
Dock calibration
If the error message does not follow the tool where the hotend was swapped, it is possible that the issue derives from the dock or its calibration.
Recalibrate the dock corresponding with the tool that displayed the error message. To do so, navigate to LCD Menu -> Control -> Calibrations & Tests -> Dock Position Calibration.
Reduce vibrations
Any form of vibration propagated to the surface under the printer, or a not fully stable surface under the printer might cause a false reading on the loadcell, causing the homing error to trigger.
For example, a printer that is in operation next to your Original Prusa XL can cause vibrations that are propagated to it, potentially causing a tool offset calibration fail. In that case, stop any printers next to your XL, and reattempt the calibration.
A possible solution to dampening the noise and vibration of a printer is to add some additional padding underneath the printer.
Komentáře
Stále nemáte jasno?
Pokud nemůžete najít odpověď na vaši otázku, projděte si naše další materiály na webu.
A pokud nenajdete odpověď, pošlete nám zprávu na [email protected] nebo přes tlačítko níže.